You may be reading this because your system is definitely having noise / hum / sound / crackle / whatever issues. As explained in the other articles, if you're using a new FlatCat pickup it is very unlikely a problem with the pickup itself. Potted in solid polyurethane, 5-star ratings by customers, hand-tested before leaving the shop, and In the several years this pickup has been on the market not one has failed. So it's the least-likely thing to be causing severe noise. If it was the pickup the usual result would be no sound at all. Thus, the need to look elsewhere.
But where do you look? There are a LOT of variables, some of them fairly complex. We have the guitar, controls, connecting cord, pedals, amplifier, power source, equipment surrounding all of that, power source... any of which can be problematic.
The logical thing is to check the easy stuff first, then move forward to the more difficult. Based on my experience and the experience of my customers, here are the things I'd recommend checking, step-by-step, in this order.
GUITAR CABLE. It is amazing how often problems are caused by a failing guitar cable. To check this I recommend trying at least three different quality cables, if posible made by three different manufacturers. If you have another guitar that is working, use it to test your cable as well. Note that a cable working on one guitar doesn't guarantee it will work on another, but if it turns out to be the cable, that is an easy fix. Defnitely the first thing to check.
USE QUALITY CABLES. Considering how much you spent on your guitar, amplifier and other sound devices, paying $20 to $30 for a quality, shielded guitar cable is not a huge expenditure. Professional musicians know: never skimp on quality cables. Go for the good ones. Shielded cables are shielded for a reason.
SHIELD YOUR PICKUP. This is a "quick and dirty" method of potentially cutting some noise. Simply cover the surface of your pickup with copper or aluminum tape. (If you don't have such tape handy, just as a test cover the pickup with aluminum foil.) This should prevent RMI / EFI from reaching your pickup. You may even want to do this on the back of the pickup. This isn't something I necessarily recommend, but in a bad RFI/EMI area, this step can significantlly reduce noise.
You can paint the tape if you like for a more aesthetic appeal. Some people actually like the copper/aluminum finish... which can be "etched" with designs using a simple plastic stylus. Your decision on this one
One BIG advantage on this step: If you do this and you still have hum & noise, you can be almost certain the problem is an equipment or ground loop problem... because you've pretty much eliminated RFI/EMI as a cause.
PEDALS. If you use pedals, a mixer or a soundboard of any kind, unplug the guitar from such devices and go directly to the amplifier. This will determine whether one of your intermediate devices is going bad or has a low battery or bad power source. If you go straight to the amp and the sound problem disappears, you're closer to nailing down the source of your problem. Then you can go through your equipment piece by piece until you find the faulty item.
AMPLIFIER. It is good to test through a second amp if available. I've found most guitar enthusiasts own more than one amp. It doesn't have to be a fancy amp either; it can be anything from a pricey alternative to a $25 practice amp. The idea here is to have a second device confirming the noise. If there is no noise, most likely the problem is with the first amplifier. Easy solve, even if you have to get it repaired or buy another amp. This also is a very common problem.
SOLDERING. You installed the pickup yourself or had a friend help you. This involved soldering. How good is your soldering technique? (Check our article here on soldering technique.) If you're a pro at soldering, likely this isn't an issue, but even pros make mistakes sometimes... or the pot burns out because it was too old to handle one more solder. So if you're new to soldering, read our article on soldering techniques. Regardless, try soldering the leads again to make sure the solder joints are good. Then test the instrument. If it suddenly works, you'll know it was a bad solder joint.
POLARITY. Although our instructions are very precise as to which wire is which, sometimes users attach the wires backwards. Alternately, on some guitars for some unknown reason the polarity is wonky to start with. Backward polarity may bring a pleasing alternate sound, or it may affect both noise and volume negatively. So you might try reversing the pickup wires to see if the polarity needs changed. If not, you can always switch them back.
To be frank, some people never even look at the instructions. So to re-state what is in the instructions: On the FlatCat the solid color wire is always ground (--). The white or white & striped wire is always hot (+).
LOCATION / POWER / RMF / EMF. As mentioned in the other articles, the location at which you're playing may be a problem. This could be because of bad power or severe RMF / EMF interference from other equipment. This happens often.
The first thing to do is take your equipment to another part of your house where there is no heavy electrical equipment to speak of. Test your outlets with a polarity tester (cheap and available at any hardware store) to make sure your power source is good. If you happen to own a metered voltage tester, check your wall current to make sure it's steady and noise-free. (See our other articles for checking ground loops. Ground loops are very common issues.)
Once you've confirmed the power is okay, plug in and check your equipment. if the noise vanishes, you'll know there's something wrong with the area where you were testing before. Whether that problem is the power outlet, other equipment in the room or whatever, you may need to do some reconstructive surgery on your playing room... or play your guitar in an electrically clean area. You may need to purchase a piece of pro equipment such as the HumX hum killer or similar device.
MAJOR LOCATION CHANGE. Take your equipment somewhere you know for an absolute certainty has clean power. This may be a friend's house, a local civic center, a local park with an electrical outlet (and well away from major power lines and junctions). There have been instances that people have discovered their entire home is "electrically ill" due to old wiring, a poor power supply (which may involve your electric company), bad grounding, or a severe RMF/EMF source (such as nearby power station or source). Such cases are rare, but if discovered may require significant electrical analysis and correction.
FARADAY CAGES. A Faraday cage is basically a "chicken wire" enclosure in which you set your amplifier or other equipment. Such a cage blocks RMF/EMF interference. Some people have had to resort to such a device. This isn't a fault of the pickup, guitar or amplifier, but literally the "electrical air" around you. There are articles questioning how safe it is to even live in such an electrical environment. But if using a Faraday cage solves the problem, it solves the problem.
Faraday cages are usually placed over the amplifier and mixer boards. A Faraday cage is easy to make, fairly inexpensive and easy to test. (I recommend cheap 1/2" square welded chicken wire, not hexagonal wound wire.) There are also professional solutions to RF interference. Check with your local music or electronics store.
GUITAR ELECTRONICS. I've saved this for last because nobody likes doing this. (Well, most people don't.) It could be that installing a new pickup pushed your right-on-the-edge guitar controllers (volume / tone / jack / switches) over the edge... and something failed. So use a multimeter to check all of your pots, all of your wire links, all of your switches, and make sure they're good. Some people have had to change out their entire control panel... after which they've verified their sound problems vanished. It's a hassle, but equipment doesn't last forever. Pots wear out, corrode, get old. Connections oxidize. So checking the electronics is a valid step in "hunting down the sound issues".
"But my prior pickup worked fine!" Yes, I know, and one would think that is a valid reason to think the problem is the pickup. But the truth is that different pickups work different ways... and some pickups are tolerant to some problems while not tolerant to others. It is obvious there was a reason you switched from that pickup to a new pickup. Likely that reason was because you weren't getting the sound or performance you wanted from your prior pickup. Your prior pickup "playing okay" doesn't mean the problem you're having now is your new pickup. It just means that your old pickup was built differently and may have been "immune" to whatever problem you're now experiencing. It's still not a pickup problem; it's that the FlatCat is more sensitive than most "brick" pickups.
I have sold FlatCats for many years to some very satisfied customers... ranging from beginners to professionals. In every case where a customer was having problems with sound, once I worked with them in tracing down the issue they discovered the problem was external to the pickup; it was never the FlatCat. That kind of consistent performance and trouble shooting has proved that a pickup that is hand-made, potted in solid polyurethane, hand-tested before shipping and shipped in a padded package... is going to work. So regardless of the situation, I suggest looking somewhere other than the pickup. To the date of writing this article, noise has never come from the pickup. You may discover an equipment or environmental issue that it took the sensitivity of the FlatCat to locate... and that results in significantly better sound and/or allowing you to install a pickup in an otherwise difficult-to-upgrade guitar.
IS THIS THE LIST OF STEPS TO TAKE? Well... these are my solutions, in the order I would take them. You may wish to switch up the order a bit or you may wish to try other solutions, depending on your situation. But this should give you a logical head-start on chasing down noise or low volume problems. As I've stated in other articles:
If your problem is noise or low volume, it is very unlikely to be your pickup. If the problem is with the pickup, the most likely result would be no sound at all. So look elsewhere for the source of the problem... step by step.
And as always, feel free to call on me for assistance. Post-sale support is 100%, and free.
One of the issues faced by musicians-- especially those just starting out in assembling or building their own equipment-- is achieving the sound they're looking for.
CONCEPTS of SOUND
Sound is made up of many components, ranging from a pure musical note-- to the environment it's played in. You can play the same instrument configuration in a small bedroom and the resulting sound will be totally different than playing it in a garage... or ultimately a performance hall. It's not just about the equipment.
In addition, sound is subjective. What sounds good to one person might not sound as good to another. Some people like heavy metal... while others prefer smooth jazz. Some like deep and mellow while others prefer "jangly and twangy". The goal of the musician is to find your niche, discover your audience, and provide what the listeners wish to hear. Or alternately, produce what you like, and let the resulting sound collect those that it attracts.
VOLUME
One issue instrument builders / modders sometimes deal with is achieving the proper volume. Interestingly, volume is probably the easiest part of sound. It's either loud enough or not loud enough... and there's always a reason for volume issues.
Oddly enough, volume is not always achieved in the manner one thinks to be obvious. Consider as an example Heavy Metal. Off the cuff, we must use hot humbuckers, a heavy-wattage amp, and overdrive pedals... right?
Well... maybe not. Because while a heavy humbucker provides a lot of signal up front, such a pickup often loses diversity of sound and nuance that might be found in a lower-power pickup. Overdrive pedals differ greatly in quality and output. And amplifiers may be big and large and produce a lot of volume-- at the sacrifice of sound quality. Sometimes a lower-power pickup that's properly boosted into a medium-wattage amp will produce much more satisfying results overall. In short, metal isn't all about volume. It's about the final output quality.
I CAN'T GET ENOUGH VOLUME
A very common misconception with new musicians is "This pickup doesn't produce enough volume". Fact: It's not the job of the pickup to produce volume. It's the job of the pickup to pick up vibrations from the instrument and strings and transfer that signal to whatever awaits it. Volume is controlled by other equpment: pre-amps, mixers, guitar pedals, and ultimately the amplifier. Volume is even determined by the strings you use.
If your volume is too low, don't pick on the pickup. Volume is produced at the amplifier.
Blaming a pickup for low volume is like blaming your car tires because you can't get the car engine past 30 mph. Yes, different pickups will produce different levels of volume, but that isn't their job. Their job is to produce quality tone.
FACT: You can produce significant volume from even low-power pickups... if you're using the correct post-instrument equipment and amplifier.
Professional musicians know from experience that a low-power pickup along with a quality amplifier can rattle the windows. Keeping this in mind, let's examine what volume is, and how to achieve it.
Reality: rather than using super-hot humbuckers, some metal players will instead use lower-power pickups... because those pickups produce a wider, more satisfying range of tone and overall sound. Those players know that if the signal is pleasing, it can be boosted to whatever levels they desire by external equipment. It's not the job of the guitar and pickup to produce volume. It's the amplifier that amplifies.
If you're building a guitar and you just can't get enough volume, the problem can be due to several issues. These are:
1. Improper phase. It could be that the wires from the pickups are in the wrong locations, causing the phase of the pickups to fight one another. This will result not only in considerably lower volume, but lower-quality tone. (Note: some musicians use alternate phases purposely, to achieve unusual tone. That's totally fine... so long as it's intended.)
2. The guitar cord. Believe it: guitar chords go bad, often at the worst time. Have plenty of extra cords on hand. The first thing to check if sound goes bad... is the guitar cord. Switch it out and test with another cord.
3. In-between equipment. Guitar Pedals. Power supplies. Bad mixer board. Anything that is between your guitar and amp.
4. The amplifier itself. The primary device that produces volume is the amplifier. A properly-functional, quality amplifier can produce tremendous volume even when a low-yield pickup is sending the signal. At the same time, the amplifier is the one piece of equipment (beyond a broken guitar) that is most likely to malfunction-- resulting in a variety of poor output.
5. Strings. One customer reported getting no sound from his system, and we worked together scratching our heads trying to figure out why. Finally as last resort he replaced his strings. He had purchased "nickel" strings, which should have worked fine. But when he replaced his strings he stated, "Wow! I had to crank the volume way down. What a difference!" Simply put: the strings he had first purchased were likely counterfeit (made of stainless steel or some other inferior metal)... or maybe something happened on the factory line and strings got put in the wrong package. Bottom line, electric guitar pickups require electric strings. Some customers have tried to use Phosphor-Bronze strings, unaware they are not intended for use with mag-based electric guitars. So if you're getting low or no volume, it's always worth checking your strings.
ONE WAY TO TEST your strings and the pickup itself is to tap the pickup (lightly) with a known-ferrous-metal item... such as a steel nail, fingernail clippers (which are almost always made of ferrous metal), or a screwdriver. Be careful not to scratch the surface during such test. When you tap the pickup you should get a very audible tapping sound through your amp. That will tell you whether or not your strings are the problem. In addition, if you hear an audibe tapping sound you know the pickup is working.
A lot of beginning guitar players (or experienced players who are not equipment techs) tend to blame pickups for low-volume sound, but this is the reality:
A failing pickup will usually produce inconsistent sound, noisy sound (static), or NO sound. A failing pickup is highly unlikely to result in low volume. That's just not part of the equation: the signal either gets through (at full power) or it doesn't. That's how pickups work. Low volume typically is not a symptom of a "bad pickup". If your volume is low... the problem lies elsewhere.
People are often loathe to consider the amp as the problem, because that means it's either a poor amp choice (mis-matched to their needs and equipment), that their beloved amp needs repaired, or their beloved amp is dying. In all instances, usually money is involved. No one enjoys having to repair or replace an amplifier.
Yet... if you're experiencing low volume, your amplifier is one of the primary places to look. Bottom line: equipment goes bad over time. Sometimes it comes off the factory line defective. So if your volume is too low, check the amp. It is the amplifier that amplifies. Even a low, low-output pickup (2 ohms or less) can produce very satisfactory volume if you're using a good amplifier.
PRE-AMPS EXIST FOR A REASON. It's surprising, but people tend to ignore pre-amps. But preamps exist because they're often needed to boost a signal before it reaches the amplifier. A pre-amp may not improve the overall quality of sound (especially if being used with a dodgy amplifier), but a decent pre-amp will cleanly increase a low signal coming from a guitar. So if your amp is working and your guitar is working but you're just not getting enough volume, consider a pre-amp. These are available in the form of pedals, pre-amp boxes, or powered mixer boards. You can also purchase "active booster" circuits for the guitar itself, which turns a passive pickup to active signal at the push of a button or turn of a dial.
Summary: Low volume? Don't blame the pickup. If you're getting satisfactory sound that's not loud enough, the pickup is working fine. Look at the parts of your equipment that have the job of amplifying... such as your amplifier.
TONE, TONE, TONE
This is the tricky part of your performance... because every single bit of your equipment affects tone. Tone is basically the elements of sound quality that result when you play. It involves bass, mid-range, treble at the simplest levels. But far much more is involved.
Tone can be mellow, it can be distorted, it can be twangy, it can be surf. Tone can be blues or jazz or country or metal or acid. Tone is everything... and achieving the proper tone involves everything from the nut and bridge on your guitar to your pickup to your amplifier to your environment.
Naturally we can't cover everything about tone here. You can read entire tomes on tone-- but there are some basics.
TYPE OF PICKUP. This is where the pickup really can make a difference. It is widely known by guitar players that different brands of pickups, different types of pickups, and even different styles within the same brand and type will produce different tone.
Most people are aware of the different types of pickups, so I won't re-hash this widely-avaialble information here. I will mention...
Specialty Pickups.Pickups such as the FlatCat don't fall into standard pickup categories. They are designed differently, act differently, and produce a different type of sound. There are countless specialty pickups, ranging from FlatCats to Inductive pickups to Dual Rails... and far more.
The FlatCat produces a very accurate, mellow sound often referred to as "Delta Swamp"... sound straight from the gutiar. The sound can be very satisfying and smooth... or at the opposite end of the spectrum growly and distorted, depending on the equipment it's used with.
Bottom line: the type of pickup used definitelyand significantly influences the tone of your performance. It's my goal in producing the FlatCat to create a tone that fits a wide variety of music needs. It can play from mellow blues to metal overdrive, depending on accompanying equipment. The same can be said for many types of pickups... so choose your pickups wisely and with research.
Achieving desired toneis really one of the most difficult tasks of the musican... and even those with decades of experience often try something new to see if they can find a new perspective on the sound they produce. Tone can be affected by the material your guitar body is made of, the type of neck, the material used in the nut and bridge, the quality of guitar cable you use and yes... the pedals, mixer and amplifier you employ.
There are no "rules" to tone. Even extensive books can only offer statistics and suggestions... but in the end, to be frank, tone boils down to the skill and experimentation of the musician.
THE SOUND
Every musician is looking for "the sound"... the overall results of their hours of experimentation. Sound is subjective. Our ears themselves are as individual as our fingerprints. Sound waves literally sound different to different people, depending on how their ears are shaped, their perception of sound, the formation of their brains as they were growing up, and the sounds/music they've been exposed to in formative years.
There is no "recipe" for sound. Some achieve it easily... some never do. I can't define how to achieve quality sound for you except for some simple guidelines:
Use quality equpment: This doesn't necessarily mean expensive equipment. I own some very inexpensive guitars that produce great sound. The FlatCat pickup sold by Wishbringer produces terrific sound, and is nowhere near the most expensive pickup on the market. There are some very nice amplifiers out there that won't break your bank account.
The important thing is that the equipment works and works well. Don't cut corners on equipment. Replace bad equipment (you'll be glad you did). A poorly-produced guitar can be difficult to play and produce unpleasant sound, ruining the music experience. A few bucks more may get you a lot more guitar or a better-sounding pickup.
Remember this rule-of-thumb: Low quality is remembered long after low price is forgotten. Good quality is appreciated long after the price is paid.
Beyond price and quality of equipment, there is the matter of what you're trying to achieve. If you're wanting to play country music, a super-hot humbucker is probably not the best pickup choice for you. You don't need a 150 watt amp to play in coffee shops; a good-quality 20 watt amp will likely produce all the sound you'll need. (At the same time, if you want to dive in for that $1000 pole amplifier system... go for it.)
A super-expensive guitar is not required to produce good sound. A high price tag has no more bearing on guaranteed sound than a label of "Vintage". Common sense and your ear can tell you more about equipment than any elite price tag or hype claims on a label. Trust your ear... and your instincts.
I hope this brief blog page helps. It is in part designed to help you locate problem areas in your equipment... and in part intended to discuss equipment concepts overall. You're the musician. In the end... what you achieve all comes down to you. Your volume not loud enough? Check your amp, intermediate equipment, control pots, jack and guitar cord, and your strings. Not getting the right tone? Check everything. That's all part of the craft... and the art of being a musician.
Wishbringer produces hand-made, custom and one-of-a-kind guitars in several categories. My policy is to put the same level of quality into any instrument, regardless of price.
You can buy an off-the-shelf instrument and have a guitar like everyone else. Or for the same money (or a little more if you want fancy) you can buy a hand-made guitar that will be a collector's item and conversation piece-- and will produce sound that will amaze your family and friends.
Following is information about the types of guitars I build and sell.
CBGs, FOLK GUITARS, COLLECTOR INSTRUMENTS
A "CBG" is a "Cigar Box Guitar". These are usually made from actual cigar boxes, which are wood and produce wonderful sound. The necks are made of oak, hickory or other hard woods, which provides a long instrument life and exceptional sound and sustain. Most of my guitars feature the FlatCat electric guitar pickup... a hand-made specialty "mag" pickup which provides jaw-dropping sound. (You can read about the FlatCat elsewhere on this site.)
CBGs are real musical instruments, are surprisingly easy to play, and produce sound that never fails to amaze those who hear one for the first time. Check the videos here to see examples of CBG performances.
Along with CBGs I make folk guitars out of other interesting materials: drums, license plates, tins, and whatever strikes my fancy.
What's special about a CBG? See the article "How to Play a CBG" on this site to see the unique properties of this fascinating instrument.
CUSTOM ELECTRIC GUITARS
You can see the WISHBRINGER PHOTOS section to see some of my hand-made, custom-ordered electric guitars. These guitars are either hand-built from the ground up, or are modifications of guitars when customers want Wishbringer's special touch added to an existing guitar. The results are unique instruments that catch attention-- and sound significantly better than their original form.
The "Rebel" guitar started out with a Fender Telecaster. Custom pickguard and paint job. Replaced the controls with a 4-volume + tone control bank that provides volume blend on each pickup individually. Added a Bigsby-style tremolo bar, a custom hand-made FlatCat pickup, a souped-up Telecaster single pickup at the neck (more power!), and a rather awesome name tag. Customer loves it.
Whatever instrument you purchase from Wishbringer, I strive to put my best into it... just as if I were building my own guitar. Take a look at the photos section and see what can be done to provide you a unique, enjoyable instrument that you'll be proud to play.
Wikipedia states of humbucker pickups: "Compared to single-coil pickups, especially unshielded ones, humbuckers dramatically reduce hum." Important note: it doesn't say "completely eliminates hum".
There is a difference between internal pickup noise (caused by a single coil) and mains hum, caused by external sources such as poor electrical feed, improper grounding, RFI and EMI. Expecting a pickup to totally eliminate all noise sources is like expecting an automobile to avoid all car accidents. No matter the quality of the car, such concept simply isn't possible.
This is why there are items on the music market like line filters, voltage regulators, and guitar shielding tape-- and is why proper grounding is important. A noise-resistant pickup makes a big difference... but is not a "magical cure" for all possible sources of electrical interference. A quality amplifier can hum even when a guitar isn't plugged in. This demonstrates the core problem with noise issues.
This is why one may need to trace down sources of hum and other noise. If one is using a quality pickup (such as our FlatCat)... any audible noise is coming from external sources. In tests conducted, the FlatCat sometimes cancelled noise coming from an already-humming amp. That says a great deal for its design-- but sometimes it's necessary to look further. One of our customers was having significant hum issues until he took his guitar and amp to a friend's house-- and the hum vanished entirely. This left no doubt his noise problems were in his home itself... and helped him later track down the source.
An article on Wikidpedia is unusually well written, helping even beginners to understand what causes hum and how to deal with it. It's not too technical, not overly long, and very informative.
This article is simplified for quick and easy location of the source of unwanted hum. There are other articles on this site discussing hum tracking in detail. This is the "quick and dirty" page for those who wish to run the easiest tests, first. In the majority of cases, these are the basic causes of unwanted hum.
My first "quick and dirty" solution is to Google "grounding acoustic guitar". Even if you have an electric guitar, you will find all kinds of helpful articles and videos that will open one's eyes to the issues of grounding, and verify that yes... grounding really is a major issue that may need to be fixed if you have hum and noise.
Note while a bad pickup can cause all sorts of problems... in the majority of cases the source of hum is not the pickup. In two places in the Wiki article it states that even humbucker pickups are designed to "reduce hum" (not eliminate it 100%). If a pickup itself were enough to eliminate all hum, companies couldn't sell hum-killer devices for high dollar. Obviously hum must be met head-on, at the source.
FIND THE SOURCE
Blaming a pickup for hum is often pointing a finger the wrong direction. Even a single-core pickup can have zero hum if the line power is clean. At the same time, even a humbucker will hum if the line is "dirty". So it's necessary to identify the true source of the hum and work to overcome it.
The three primary sources of hum are "dirty" electrical source, ground-loop issues and RFI/EMI (wave interference). The source of the hum could be any of these. But RFI/EMI can be shielded and sent to ground, so in the end it still comes down to making sure your instrument, amplifier and power source are properly grounded and your power clean.
DIRTY ELECTRICTY
I recommend Uninterruptable Power Supplies for ALL important electrical equipment (music equipment, televisions, computers, etc). They are no more expensive than a good surge protector... and work better. They are available from low cost to high. The higher price versions are to provide more power and remain online longer if the wall power goes out. For most players even low-cost power supplies are sufficient. Of course a UPS is no magical solution to all hum. In music there are many variables. But employing a UPS to filter your power source is a fairly simple and relatively low-cost solution.
THE STEP-BY-STEP TEST
The above principles and concepts understood, following is the step-by-step test to trace down the source of any hum issues.
1. Check all instrument wire connections and make sure the solder joints are neat and solid. Even a "good looking" solder or piece of equipment may contain vital microscopic flaws. Sometimes re-soldering all joints solves the problem.
2. Turn the volume to minimum, turn on your amp, and bring up the volume to normal playing level. The GAIN should be set to minimum (gain by nature often causes noise). Bass, mid and treble should be set to mid-range or lower (on most amps a setting of 3-5 is considered good testing range).
3. Touch the guitar-end of the connection cord to make sure you have continuity and that it doesn't "roar" (too much power from the amp). You just want a mild sound when the end is touched.
4. Plug in your guitar. Ignore any noise or hum (that's what we're checking and we take it for granted it's there). Strum a few chords and notes to see if the sound is normal, acceptable sound without excessive "noise". Most instruments when played should pretty much override any noticeable hum. That's the purpose here: to make sure there's no *excessive* source of noise that might indicate more serious problems than basic hum.
5. Quiet the guitar strings (mute with your fingers). When the guitar is quiet, cease touching the strings. You'll be able to hear hum (if there is any). At this point, touch the metal sleeve on your guitar cord to see if the hum remains or vanishes. If the hum vanishes when you touch the metal sleeve, that indicates a ground loop issue that will need to be traced and corrected / counteracted (thus the other two articles).
6. If there is still hum when you touch the sleeve, that is indication the hum is internal to the instrument. The instrument itself should be checked for proper internal grounding (pickup, bridge, strings, controls), and that all areas are properly shielded against RFI/EMI. It is also possible in this case there is a problem with the amp. To test this plug in another instrument and see if the problem persists. If it does, look to the amp as the issue.
7. If your amp has 3 prongs on the cord, turn it off, unplug it and plug the cord into a 2-prong wall adapter (available cheap, anywhere). Plug the amp back in and turn it on. If there is no hum-- the problem is definitely a wall-based ground-loop issue. Whether there is hum or not, after a few seconds turn the amp off and remove the adapter. A 3-prong amp should not be operated for any length of time using a 2-prong adapter (even if the hum vanishes). But hum vanishing when using a 2-prong adapter definitely isolates the cause of the hum... and indicates how it needs to be fixed.
IF ALL ELSE FAILS...
8. This test sounds strange, but if hum persists, wrap the body of your guitar with aluminum foil and make sure the foil connects with the cord jack sleeve (for grounding). If the hum disappears, the problem is very likely RFI/EMI interference (you can do the same with your amp). Be sure to use quality shielded cords.
Then un-ground the aluminum foil from the cord and see if the hum situation changes. This is basically a "let's see what happens" test to see if there is significant external interference. Of course you can't play an instrument wrapped in aluminum foil-- but it will indicate if the problem is a lack of shielding... or trying to play the instrument near an excessively "noisy" device such as a computer or other electrical device that is emitting undue RFI. If your guitar is properly grounded there should be no difference between grounding the foil to your guitar cord or not doing so.
10. Try using a different guitar or different amp if avaialble. This should help you determine if the problem is intrument or amp oriented.
THE ABOVE STEPS should in the majority of cases help you find at least a hint of where hum problems may be originating. In many instances the source of hum is unfiltered wall power or nearby electrical interference that is creating electrical hum. There are ways to overcome such (UPS devices, Hum-X filters, voltage regulators, Faraday cages, etc). If the problem seems to be the amp or instrument, then of course more professional steps will need to be taken to isolate such issues. Your local music store or a good friend with electronics / guitar knowledge may be able to help you there.
I often get asked he question, "Which guitar strings should I use on my guitar?" This is actually one of the more important factors of getting the sound you want out of your instrument.
START WITH A GOOD AMPLIFIER
With any electric guitar (solidbody, hollowbody or acoustic) is must first be understood that the primary sound you will obtain results more from your amplifier than your guitar. A great amplifier can make a cheap guitar sound good, while a poor amplifier can make a prime guitar sound terrible. So making sure you have a good amp and that the sound at the amp is adjusted properly is very important. That's the subject of another article.
THE GUITAR ITSELF
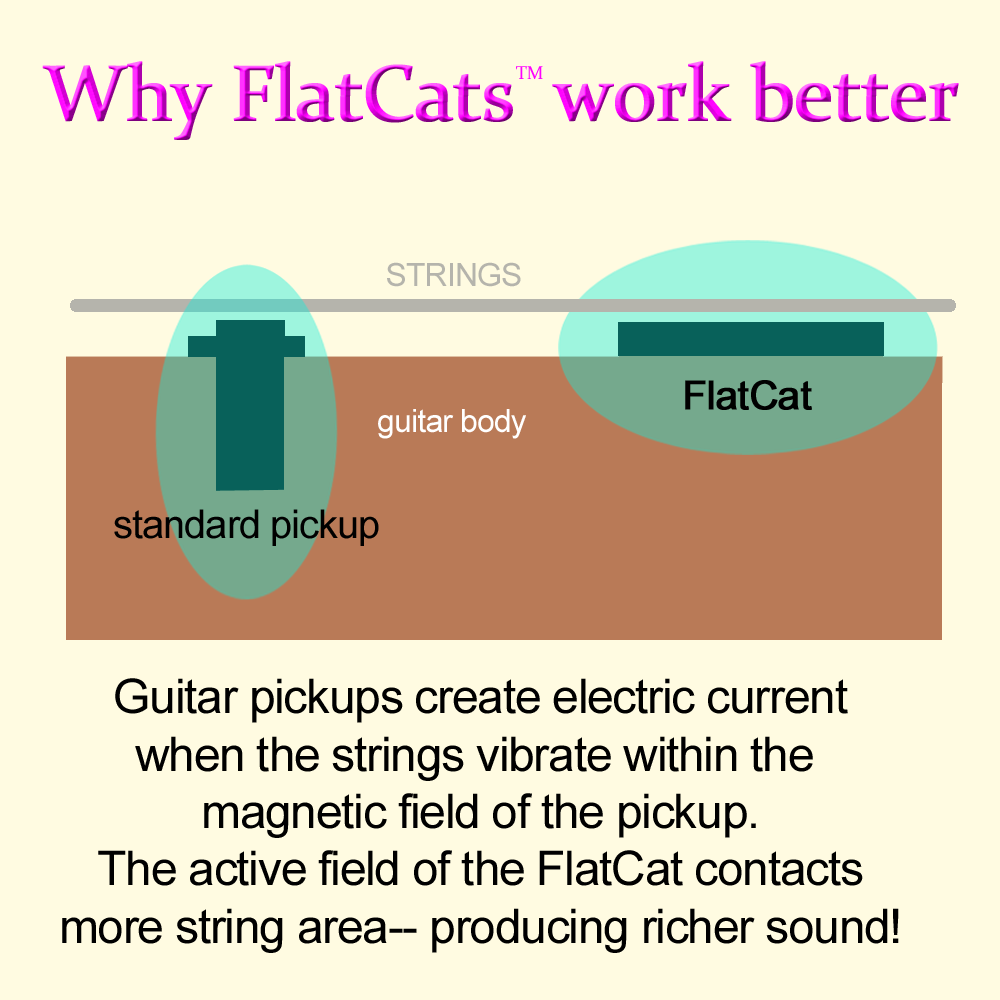
Taking it for granted you have the amp and settings you like, we focus on how an electric guitar produces sound. Let's first of all debunk a commonly-heard rumor that the body / wood / composition of a guitar makes no difference. This is claimed because technically, mag-based electric guitar sound is produced from strings vibrating over a magnetic pickup, disrupting the magnetic field and producing electric current through a coil. Supposedly that pickup is influenced only by the strings and not the guitar itself. In reality, nothing could be further from the truth.
The truth is the composition of the guitar makes a lot of difference; if this were not true, there would be no need for a hollow body guitar vs solid body. Yes, the strings vibrate over the pickup, but both those strings and the pickup are attached to the guitar, and the guitar itself will affect how both the strings and the pickup itself vibrates. Even miniscule vibrations (such as from the body and even the strings on the nut) can carry through to the pickup.
Is there a difference between alder, basswood or even acrylic in the resulting sound of the guitar? Yes. We need consider the scientific physics of how sound is produced, the effect of material density on vibration, as well as the property of sustain and the fact that harder substances hold sustain better and longer than absorbant softer substances.
Practically everything on your guitar affects the sound, from the body composition to the neck material, to the nut and bridge. So all of these are factors in producing the sound you want. Being aware of this helps us understand that far more is involved in overall sound production than strings and pickups.
The point made: your guitar itself does affect the overall sound. Otherwise, there woud be little need for different types of guitars. So the type of strings you choose can depend on the type of guitar you're playing. Often the guitar manufacturer can recommend a specific type of string for your guitar model and playing style.
GUITAR PICKUPS
There are basically two types of electric guitar pickup:
1) Magnetic (Mag). This usually involves a magnet and a coil of copper wire, which produces electric current when ferrous-metal strings vibrate above it. (Ferrous metal is that which affects magnetic fields: steel, nickel, chrome.) The advantage to a mag pickup is production of the "electric" sound so many players love, as well as immunity to external noise. The downside is that string choice is limited; a mag pickup will not work well with phosphor/bronze strings and not at all with nylon.
2. Microphonic pickups. There are many kinds of microphonic pickup, ranging from actual microphones to piezo. These do not rely on a magnetic field and thus can use a wide variety of strings ranging from acoustic to electric and even to classical nylon. The downside of a microphonic pickup is that it can pick up sounds other than the guitar (bumps, scrapes, external noise) and is more prone to feedback. However, some players use this to their advantage, adding percussion affects to their playing. However it can be difficult to obtain "electric guitar" sound from a microphonic pickup, as they tend to produce more of an acoustic tone (depending on the guitar).
There will be a wide variety of opinions as to which pickup is better. Most would agree there is no "better", for the simple reason that sound is subjective, judged by the ear of the player and listener. As with all things, it depends on the pickup, the instrument and the intended purpose.
For the purpose of this article we will be discussing strings for mag pickups. Other pickups, you can choose pretty much whatever strings you like.
NOW THE STRINGS
All of these thing considered and taken care of, now we get to the strings. Whether you're playing a solid-body Telecaster or a hollow thin-wall Cigar Box Guitar, which strings you choose will depend largely on your preference and desired sound. Following are some basic guidelines to help you choose:
As mentioned prior, you cannot use phosphor-bronze or nylon strings with mag electric pickups. They work by sensing ferrous metal vibration. Phosphor-bronze contains a bit of steel core, but the majority of the string is made of non-ferrous material. Nylon is not metal at all.
There are a wide variety of electric guitar strings, made of different materials: steel, chrome, nickel or combinations thereof. There are also different thicknesses of strings, ranging from ultra-lite (very thin) to extra heavy (thick).
Strings will also vary from brand to brand. Some brands are known for richer tones, others more vibrant, while some emphasize the bass end, others emphasize the treble and still others "balanced". Quite often the best guide for strings is the website of the string manufacturer. They will list in detail the strengths and purposes of their different string models.
But the only real way to find the best strings for your purpose is to invest in different sets and see how they sound. One type of string can differ significantly from another in sound and in ease of play. If you find a string painful to play you likely won't play as much. A more comfortable string that produces sound you enjoy will encourage playing. If you just happen to hit on the "perfect" string first time (one that you love to play and like the sound), you can consider that fortunate.
Some will state that light-guage strings are the best choice, as they are easier to press and "bend"... and their overall sound can be adjusted at the amplifier. This is a reasonable argument.
Others will counter that for some types of music light strings just don't cut it, and require heavier strings. There is no single firm guideline to follow in this. The type of string you use depends very much on your instrument, the type of music you play, and your personal taste.
THE MOST IMPORTANT FACTOR
Overall the most important thing in choosing a string is what you like. While you can use string manufacturer websites as well as advice from associates as a launch pad, in the long run you have to decide-- both by playing and by your ear-- what string works right for you. You will ultimately decide on the brand, composition and thickness that produces the play and quality that suits you.
If a set of strings sounds too "twangy", you may wish to switch to a different material or heavier string. If the set you're playing is too difficult to press and causes your fingers to bleed, you may want to consider a lighter set. Such is entirely your decision.
In the case of Wishbringer guitars, I tend to use D'Addario or Fender strings, although I've been known to try others as well. I usually stick with a .009 or .010 high-E guage. These well suit the purpose of most of my guitar creations.
Without intending brand promotion, I can state that the majority of cigar box guitar players I've spoken to recommend D'Addario as the brand of choice... but some prefer other brands.
Whether you choose steel, nickel or chrome depends on many factors: what's available, your playing style, choice of music, type of instrument. You'll likely use different strings on a cigar box than you might use on a tintar (a guitar made from a rectangular tin box). If you play lead you may wish a more vibrant string. For accompanying chords you may wish a more rich sound. Again, websites can offer particulars on what sound different metals, thicknesses and type of winding produce.
I realize this may seem to lack the "specifics" one may wish in choosing a string, but it is the best overall advice that I can give, based on decades of experience in choosing strings. In the end, no one else can choose your string for you. That decision is totally up to your fingers and your ears.
Soldering isn't difficult if one knows the "tricks of the trade".
THE TRICKS OF THE TRADE 1. Use the right soldering iron. For guitar work a soldering iron of approximately 30 to 60 watts is best. If your iron has a temperature indicator, about 400 to 425 degrees is perfect. 15 to 20 watt irons are not strong enough... 80+ watt irons are "industrial" use (home electronics) and can burn out components. So as with all things, use the right tool for the job.
2. Use quality solder. Most people prefer high-quality tech-use 60/40 lead-based rosin core solder. Some prefer non-lead solder, but it can be a little more difficult to use. Thin solder melts faster and applies better. Thick solder is intended for household wiring, not guitar electronics. You'll want solder applicable for digital electronics or music work.
3. Heat the solder, not the work. It is often wrongly instructed to get the metal hot and then apply the solder. However, doing so can damage the metal, melt associated heat-sensitive parts (such as rubber grommets or seals), and with guitar potentiometers (volume / tone controls) can easily burn out the pot.
A BETTER WAYis to melt the solder and apply to the joint. First make sure your two items are properly aligned. If joining wire to a tab, insert the wire through the hole (if there is one) and bend back to form a good connection. If there is no hole or if you're putting the wire on a flat surface, make sure the wire is fully laying on the surface (no gap between the wire and surface). You may need to use assisting items such as clamps or the popular "third hand" device to get the wire to lay properly on a flat surface.
Make sure your iron is preheated and ready to go. Bring both solder and iron close to the joint... then A) Touch the solder to the item B) apply the iron to the solder (not the item) C) Allow the molten solder to flow to the piece.
Solder conducts heat very well. It will flow onto and through the joint, instantly transferring the heat from the iron and heating the metal to the proper degree. When you see the solder flow properly and take on a silver-shiny surface, remove both the solder wire and soldering iron. (You can practice this a few times on bare wire to get the knack.)
Summary. By using the solder to transfer heat instead of the iron you cause the solder joint to form more quickly. The solder helps prevent damage to the device, and the joint will then cool properly.
This technique is easy to learn, easy to apply, and pretty much works every time. You are using the solder itself to act as both heat transference and buffer device between the soldering iron and the work. This minimizes possible damage to components.
This article is a basic "think about it" commentary. I do not herein propose industry wide change. It's just food for thought... and explanation of some of my latest projects.
MY ZERO-KNOB GUITAR
I built an electric guitar for myself that has no control knobs... straight pickup to jack. Let me explain why.
IT'S NOT REALLY WHAT THEY DO
As guitar builders know, volume and tone knobs are potentiometers. There are different potentiometers: 250k, 500k, 1M, Type A and B. But in the end game they differ not in tone itself, but tone potential and in the way they produce it. A 500k pot contains all the sound potential of a 250k pot but allows more treble. An A or B pot either one produces the same sound output... just at different speeds of getting there.
But what's more interesting is that a volume pot really isn't a volume pot: It's a "tone cutter". It starts by cutting out the high tones, then cuts out mid tones, and then on the low end cuts all tones completely. It seems to be a volume pot because it does indeed reduce audible sound. But it does so by simply grounding out specific ranges of sound, starting with the high tones until it cuts out all the tones completely.
The downside to this: if you use your guitar volume knob to turn down volume slightly, you're in reality cutting out part of the guitar's treble range. Is that really what you're wanting to do?
A tone pot does change the sound coming out of a guitar... but in most instances it tends to muffle sound rather than accurately change its tone.
Do you really want to "muffle" your guitar?
Don't get me wrong; there's nothing wrong with volume and tone knobs. They're used industry-wide and people like them. They do offer utility and convenience and sometimes you can get the exact sound you want by using guitar controls. But that doesn't mean they're absolutely required. They are not essential to producing good sound... nor are they even the best way of doing so.
PROVE IT TO YOURSELF
Adjust the volume and tone knobs on your guitar to different levels. Listen to the results. Then crank all your guitar knobs to "10" (full pickup output mode) and change the volume and tone at your amplifier. Chances are you will notice a significant difference, with the amplifier alterations sounding much better.
Why is this? Because a good amplifier has circuitry built in to adjust volume and tone properly, beyond the basic capabilities of a simple potentiometer.
So this leads us to ask: Which is better, to adjust volume and tone at the guitar, or at the amp? If the amp does it better... why not use the amp?
This concept is why professional musicians often use equalizer boards, pedals and sound boxes. It's why amps have all those fancy settings in the first place.
The truth is, many professional guitar players crank both volume and tone knobs to "full 10" setting and then adjust output at their amp. (Alternately, some use their control knobs only for "special effects"... such as using the volume knob to create a slow warble or vibrato.) Bottom line: these knobs can be useful, but they're not "absolutely necessary".
Think about it this way: if a guitar volume and tone knob were sufficient, why would an amplifier need such? Why wouldn't the amp have no knobs, and just let the player control it all from the guitar?
OUTPUTTING PURE SIGNAL
Wishbringer FlatCat pickups produce beautiful sound when wired straight to the jack. This is the case with many quality pickups... but commonly beginning guitar players aren't aware of this because they never give them the chance to do so. Many players are under the impression that volume and tone controls on the guitar are essential to getting the "perfect sound". In reality the opposite is true; you will achieve the most precise, accurate sound by bypassing all controls entirely, sending the pickup signal straight to the amp without any controls interfering with or altering the sound in anyway. (Even 500k knobs take out significant top end treble from a pickup signal.)
By sending pure signal to the amplifier, with no potentiometers getting in the way, no pots to go bad, no interference with the current and no potential grounding issues... straight-to-jack can also help reduce potential "hum" problems, especially if you use shielded or twisted-pair wire. The fewer the connections, the cleaner the sound.
A WONDROUS NO-KNOB ELECTRIC GUITAR
The guitar I recently major-modded is an old archtop which was unplayable. The surface looked terrible. I spent a few months on it, taking it down to bare wood, re-gluing where needed, re-finishing in ivory white, replaced the fretboard with a mother-of-pearl inlay board, and then replaced all the hardware with gold-tone to make it pretty. For the electronics I used a FlatCat pickup near the neck. I wanted the purest, richest sound I could get to go to the amp, so I ran the FlatCat straight to the jack. I can adjust volume and tone at the amp with better results, with no potential distortion from basic pots.
The resulting sound is awesome, undistorted, clean as it can be, "Delta Swamp" with incredible acoustic overtones. There are no unsightly knobs to get in the way of playing. Quite a bit less wiring involved as well, with zero hum or noise. And I can get any tone I want out of it by adjusting my amplifier.
Just something to think about. It's an unusual idea, but with sound reasoning behind it. One might be surprised how many musicians "bypass" their guitar controls by cranking them full-on "ten" and letting the amp do its job. Bypassing controls might work for your project as well.
One of the questions I get asked most often is what type of "pot" to use with the FlatCat surface-mount pickup. This question is also asked when someone is building their own guitar-- which pot will work best?
The quick answer: either pot will work fine with the FlatCat. Here's why:
THE K RATING. "Pot" is short for potentiometer-- an electronic component used for both volume and tone controls on your guitar. Generally pots come in three ratings: 250k, 500k and 1,000k.
The "k" rating signifies the top-end treble sound the pot will allow through to the amplifier. The lower the number, the less high-end treble gets through.
Thus 250k pots are often used on bass guitars or guitars that have a naturally high-pitched tone (such as the Stratocaster with single pickups), to limit the top-end treble. 500k pots allow more treble to pass through.
TYPE A or B?
There is probably no more controversial an area in guitars as to whether type A or B potentiometers should be used. One can read the Internet and find heavy arguments both ways.
In general, the concept is that A= Analog (audio volume) and B= Linear (tone). The two types will achieve the same results on both ends of the scale; the difference is in how they get there. A tends to move evenly from one end of the scale to the other, whereas B increases power faster on the front end and more slowly in the second half.
So the standard advice is to use A for volume, B for tone. But there are claims and opinions equally strong on both sides of the issue. Manufacturers of sound controls will use both A & B pots in different configurations; even the pros don't seem to be able to agree on which type to use for which control. One writer says he 'just uses type A for both volume and tone and forget the controversy'. But a prominent manufacturer uses type B for both volume and tone.
You can read article after article that says to use type A for volume and type B for tone. But if you purchase pre-assembled tone control sets from different manufacturers, theywill not be consistent in which type of control they use. So what is the layman to believe?
Since opinions seem to run equally strong on both sides, my opinion is to use whatever you have on hand... or whatever sounds best to you. Sound is subjective. Some people like one kind of control type, others like another. I've personally used both A and B pots on both volume and tone and noticed no significant "advantage" either way. They both will alter both volume and tone and will both produce identical resulting sound. As with most things guitar, there is no "better"... there is just different. Of course, there are different qualities in pots. It makes sense that more expensive pots tend to work better overall than cheap pots.
I know that sounds like a non-committal answer... but check the Net yourself and read the forums and blogs. You'll see why it's difficult to give a definitive, absolute answer on this one. Some people prefer whiskey, others prefer vodka. Choose what you prefer.
VOLUME IS TONE? Note that with either pot, as you turn down the volume you are literally reducing the K value-- causing the pot to also act as a "tone control" to an extent. So as the volume decreases, so does more of the treble. In reality you're not decreasing the "volume"-- you're decreasing the range of tone that passes through the pot until at zero setting, little or no tone is getting through (thus no volume).
That is why many volume controls seem to go from "zero to 60" quickly... but then taper off on the upper half of the dial. The lower end is allowing more of the bass sound through (loud) whereas the upper end is allowing more treble sound through (less "power" in that sound range). Capacitors can be added to pots to help correct this issue by allowing treble to pass through regardless, but that has its disadvantages (volume never goes to complete zero). Many guitar manufacturers don't worry about tone shift on the volume control and just use a straight pot, unaltered.
Because of this, it is common for guitar players to turn their guitar volume to max and control the volume either at the amplifier or through a foot pedal. Quality amps and foot pedals tend to have more advanced volume control systems that compensate for tone alteration.
THE STYLE OF MUSIC. Which pot you use may also depend on the kind of music you're playing. Country music often uses the full-range of 500k pots. Blues tends to smooth that out a bit with 250k pots. Heavy metal sometimes uses 1000k pots for that "shrill" effect. But many country artists use Stratocaster guitars... which use 250k pots. Others use hollow-body guitars and 500k pots. There are no rules.
Since 500k pots contain the full 250k range and more... I typically use 500k pots. With the FlatCat pickup either pot will do fine. FlatCats reproduce all sound ranges equally well.
I build and sell "cigar box guitars"-- or as I prefer to call them: "box guitars"... because they can be made out of just about anything. I've built guitars out of cigar boxes, cardboard boxes, license plates and even Altoids Mint tins. I've seen them built from silverware boxes, wine boxes and more. They have all sounded great. The trick is: it's not so much what they're made from, as how they're made.
I enjoy helping people learn how to build their own instruments. If you're going to build it yourself it's good to know the pitfalls ahead of time. If someone can't build one (for whatever reason) or doesn't have the time or tools, that's where my store comes in. Either way, the idea is to get music in the hands of the people.
In addition to instruments I also offer the popularFlatCat guitar pickup as well as other accessories. People buy these to put on guitars they have built themselves. Some are experienced builders, some are just getting started.
For customers who are building their first CBG, here are a few hints to help avoid "beginner errors". I hope these help.
* The neck should be no thicker than 1" total (3/4" + 1/4" fretboard), A standard 1x2 board works fine for the neck base. (A 1x2 actually measures 3/4" x 1.5")
* The neck is the most important part of a CBG. If you're just making a 3-string guitar and two of those strings are trebles, poplar wood can work okay for the neck. But I recommend using oak, hard maple or similar hardwood. Although poplar is common for use on CBGs because it's easy to carve, drill and finish out... it can warp over time. If you're using heavier strings or making a 4 string CBG, you'll definitely want hardwood. If you're building a 6-string, you'll need a pre-built guitar neck or make your neck with a tension rod inside.
* If you want to make a basic CBG, try the design at the top of this page. It is easier to build than a neck-through-the-box design but still sounds great
* If you decide to run a board inside the box.. make sure the bottom of the fretboard is level with the box top... and a full 1/4" above the surface of the CBG. Otherwise you won't have room to install even a flat pickup. Your aim is to have at least 3/8" string clearance above the box. If you glue a 1x2 board to the underside of a cigar box lid and place the fretboard directly to that, it will be too low for proper string clearance. There are many ways to bring the strings 3/8" above the surface of the box. Neck placement and level will be the most important design element on your guitar.
* If you're installing a FlatCat, you can run the neck through the box, and then cut a hole in the top of the box the precise size of the FlatCat, so the pickup sits on the neck instead of the box top. This is fairly easy to do: draw an outline of the FlatCat on the box lid, then use a Forster bit and hand file to perfect the edges of the hole. However this isn't necessary if you design the neck ahead of time to run the strings 3/8" or more above the box.
* Make sure the tuning gears are facing the right direction. Otherwise the pull of the strings can pull the two gears apart and make tuning difficult. The string peg should be toward the bridge, with the tuning key toward the top end of the neck. That way when the strings pull on the peg it connects the gears rather than separating them.
* If you use volume and tone controls, make sure the holes are drilled far enough away from one another. Consider the size of the pots inside the box and the total size of the cord jack, and position the holes accordingly. It is a common mistake to drill holes too close together, so think carefully about parts placement prior to drilling.
I hope these tips help. If you have any questions, feel free to contact me. I enjoy helping people and advice is free. : )
Notice the common-sense installation methods in the photo below. The FlatCat wires were run through the guitanjo head and over to the control pots, which are installed in the upper top side of the instrument. The outer drum tuners are grounded (good choice) as are the strings. The wires running to the extended, through-body jack are wrapped around the central metal support to reduce RF/EM interference, significantly cutting potential hum and noise.
FlatCat on a Traveler Bass-- a guitar that has hardly any room to add a pickup. Customer reports: "This pickup worked very nicely for me on my traveler bass. Solved the problem where the old piezo pickup was too quiet and wouldn't work with my Rocksmith guitar game. Looks nice as well!" - Greg
On a 60s Gretch Clipper archtop. Beautiful instrument, and the FlatCat fits in perfectly.
Customer Comment: Worked out great. This is an original 60s Gretsch Clipper. The problem with all of these guitars is that the pickup is too high - leaving even the smallest amount of clearance between the top of the pickup and the strings makes the action too high to be easily playable. They were like this from the factory. Your pickup fixes a problem that's been there for sixty years. The guitar did not play this good the day it left the factory. -- Matthew S.
=============================================
FlatCat Bass Assist on a Gibson by Phillip Krzankowski
Phillip used a CBG FlatCat to emphasize the lower three strings on his Gibson guitar by offsetting the smaller-than-normal pickup to one side. He reports being very pleased with the results.
This dandy guitar uses a Molten Iron FlatCat and cranks out some amazing sound.
================================================
FlatCat on Jim Hillis CBG
The Molten Silver color goes well with the palm rest. Beautiful job. Cigar boxes can be difficult to come by in some areas; Jim uses a cake pan for the back of his guitars.
==============================================
Brooks Williams with his FlatCat-based resonator. Brooks is a professional performer with decades of music history. He upgraded his prized dobro to the FlatCat and has used it as well as a FlatCat-based CBG in numerous performances.
Here is a video from this fine performer, using a FlatCat-based CBG:
https://youtu.be/iSoIOyOOJBw
Another on his resonator. Suggest starting at 13 minutes:
https://youtu.be/fQzSzoR6ryw
==============================================
4-string CBG by Kevin. - Old canning Ball Jar opener for the tailpiece (handy bottle opener at the end!), drawer handle for the bridge, walnut neck, skeleton Key nut.
==============================================
Nicolas Savaria Vintage Kalamazoo Archtop installation
FlatCat Altoid Pickups on shovel guitars by Jeffrey
These antique collectors-item tins were supplied by the customer and turned into guitar pickups. Customer review: "This pickup is perfect for my slide shovel guitar, fit like a glove n extremely clear n loud, lowest setting on my Peavey Amp will wake the dead."
Mark T. Custom Electric composite photo. This guitar body was made from poplar (a softer hardwood that is relatively easy to work but offers excellent resonance). Customer reports superb sound with the FlatCat pickup.
I'd like to thank these customers for taking the time to photograph their finished instruments so we could all see the results. Fine looking work. There's just nothing like personal creativity to enhance an instrument... or make something totally new!
Hum and buzz when plugging in an amp. Annoying and frustrating. Where is it coming from? Is it the git, the amp or something else?
Many articles have been written on this. Doesn't hurt to re-hash once in a while. This is a step-by-step process for locating and eliminating hum, starting with easiest-to-check. If you only have one set of equipment you may need to ask a friend to bring over a guitar amp and cord to double check some things.
TEST FOR GROUNDING ISSUES
Touch the metal jacket on your guitar cord when it's plugged into the amp. If the hum vanishes you likely have a grounding problem somewhere. Read pt 2 of this series for fixing grounding issues.
TEST THE CORD
Poor guitar cords are notorious for creating hum. Try a different cord. If hum still persists, you may want to invest in a quality, shielded cord. They cost a bit but there's a reason for that: they help eliminate external sources of hum. If the hum disappears it's money well-spent. If not, it's still money well-spent.
TEST THE AMP- WALL TRANSFORMERS
In one instance I thought the hum was my guitar; it turned out instead to be the wall wart (AC Converter) that fed my Roland MicroCube. How did I find out? I unplugged it and ran the cube on batteries and the hum vanished. Another way would be to try other wall warts and see if they do better (once I went through six wall warts until I found one that worked properly. They are notoriously poor in manufacture).
TEST THE AMP- STANDARD
Try a different amp if you have one and see if the hum disappears. If hum vanishes, you just located the source without much trouble. Internal wiring is out of my ability to trace without risk of painful or fatal electrical incident. In such case I usually just acquire a new amp. If your amp is pricey, repair may be the only option to stopping the hum. Again, this is if your current amp hums and a replacement amp doesn't; that pretty much pinpoints the hum source.
TEST THE INSTRUMENT
Test two or three guitars if you have them and see if the hum remains, vanishes, or changes. If the hum remains across all gits, then that almost insures the problem is either with the amp or the environment (unless of course, you have 2 or 3 problem gits-- not likely). If it's the instrument, see below on how to correct that problem.
TEST LOCATION / ENVIRONMENT
If hum persists, eliminate the environment as a possibility. Hum could be caused by something in your home or workshop. Entire houses or even city blocks can have unstable electric flow, causing hum in the lines.
Is the problem an ungrounded outlet? Use a 3-prong outlet ground tester to make sure the outlet is grounded (available almost anywhere). If all shows green you're good to go. If it shows ungrounded, you'll need to ground your outlet-- or switch to another outlet that is grounded.
If your outlet is grounded, take the git and amp to another location and see if you still experience hum. First move to other rooms and test the system. If the hum persists move to another place entirely... a local park with electric outlet or someplace totally away from your home area where you can test your guitar and amp. If the problem is in your home... an entire area of the city up to the central transformer could potentially be affected. Eliminate the environment as a cause. If you go elsewhere and the hum disappears, you'll either need to just get used to the hum or invest in a hum eliminator device or voltage regulator (plugs between your amp and wall socket to stabilize voltage and eliminate hum).
Do you have fluorescent lights? Those little twisty bulbs? Computer equipment nearby? Heavy electronics nearby (microwave, television, etc). Those are known sources of RFI (radio frequency interference). You can try isolating your music setup from proximity to those,
HOW TO FIX A WONKY GIT
If the hum problem turns out to be your guitar... something isn't connected properly somewhere. You'll want to make sure items that need to be grounded are connected to the negative (center) pole of your guitar jack-- either directly or through a central grounding wire. If you don't understand guitar electronics, you may need to have it checked at your local music store.
* Pickups. "Humbuckers" are so named because the double-coils naturally inhibit hum. If you're using a single-coil pickup (common with CBGs) the pickup itself could be the source of hum. Google shield coil pickup for lots of information on eliminating pickup hum.
* Pickup cover. Some pickup covers are metal and have to be grounded. If they're not they can cause significant hum. Solution: ground to the pickup ground wire.
* Sound wiring. Sometimes the instrument wiring is simply hooked up wrong. Double and triple-check the wiring layout and see if all the wires are where they're supposed to be. Is the guitar internal wiring grounded properly?
* Bridge Saddle. Usually both tuning keys and strings are grounded through the bridge saddle, which itself is grounded through the bridge base. Sometimes that grounding comes loose, or was never properly grounded in the first place. If the strings don't touch metal you may need to add a metal strip to the tail or bridge and ground to the jack in order to ground the strings. They're steel / nickel / chrome and are basically horizontal antennas... very sensitive to interference. Make sure everything metal is grounded.
* Fancy do-dad. If you have a license plate or other metal decoration on your git that's any larger than a bottle cap, it could be picking up interference. If there are metal decorations (especially license plate guitars), ground them.
* Faulty pot grounding. Sometimes a ground solder on a pot may look good but actually not be grounding correctly. In other cases the pot itself is burned out and not grounding correctly. In some cases the pot can be faulty right from the factory. If you've tried everything else and it still hums, I recommend:
a) Unsolder and re-solder all ground connections on the pot (being careful to not get the pot too hot. Touch the iron to the solder, not the pot, and molten solder to the pot).
b) If it still hums after that, replace the pots one by one and see if one of them was faulty.
THE FINAL, LAST-DITCH OPTION
If you've done all of the above and hum still persists, yet it goes away when you touch the guitar cord jacket... procure for yourself a "grounding wrist band". You can buy these online or at computer stores in the form of "anti-static wrist bands" or make one yourself out of a loop of flexible wire or mesh and a gator clip. When playing, wrap it around your wrist or run under your shirt, then clip it to ground somewhere on the guitar. That should solve the hum problem no matter where it's coming from.
In my experience if you do all the above, chances are the hum is going to vanish at one point or another and your problem will be solved. If not... what's why there is a part 2 in this series. ; )
Note: This article applies to 110 / 120v electrical sources common to the United States. Higher voltage sources in other countries would need to refer to electronics specialists in their area.
There it is again... that annoying hum from your guitar amplifier. What is causing that? It seems to come and go. Sometimes it's louder, sometimes softer. Is it the guitar, the amp or something difficult to identify?
CAUSES OF HUM
There can be many reasons for hum or noise in a piece of equipment (listed here in order of "easiest to identify and correct"):
* Jack-related ground loop issues
* Electric line ground loop issues
* RFI / EMI (radio frequency or electromagnetic interference)
* Bad line power ("noisy" electricity)
* Bad instrument or amplifier
... and stuff that really is difficult to identify. Fortunately the most common causes of amplifier noise are easy to identify and correct-- although it may cost you a bit to fix it.
JACK-RELATED GROUND LOOP ISSUE
This is very easy to test. Plug a regular guitar cord into your amp (but not into your instrument). If you hear hum / noise, unplug the cord. If the noise vanishes, you have a jack-related ground loop issue.
Fixing this problem is reasonably low-cost (about $20 or so). You will need to purchase an instrument/microphone ground loop eliminator. Models are made by Pyle, Behringer and other music companies. You plug your instrument cord into this device and then run another cord to your amplifier. If the hum is instrument or cord related, this will very likely correct the majority of the problem.
Note that this may not fix issues in which there is something wrong with the instrument (an internal short or grounding issue). For that you'll need to have the instrument inspected and repaired. But if you tested with a raw guitar cord and the problem disappears when the cord is unplugged from the amp, a jack ground loop eliminator will very likely be the solution.
ELECTRIC LINE GROUND LOOP ISSUES
Testing for this issue is easy if your amplifier has a 3-prong electric cord. (If your amp has a 2-prong cord, you can skip this section.) Sometimes interference from "ground loop" causes noise problems (other items on the line).
IMPORTANT! FOLLOW THESE INSTRUCTIONS FULLY! To test for this use a common 3-prong to 2-prong adapter (a little plug you can find in almost any store). If you plug the amp in using this adapter and the noise vanishes, you have an electric line ground loop issue. Whether the hum vanishes or remains, once the test is performed (2 seconds or so), immediately turn off the amp and remove the test plug. A 3-prong amp should never be operated with a 2-prong adapter for any length of time. This is for testing purposes only.
Resist the urge to keep using this easy and inexpensive device to fix the issue. There is a reason your amp has 3 prongs; using a 2 prong adapter for a length of time can cause grounding issues and result in blowing out your amp or (worst scenario, however rare) starting a fire or severely shock the player. Just don't do it.
What you will need in this case is a power ground loop filter, which can take care of such problems. It's not an inexpensive fix ($60 and up depending on your source) but it will most likely fix this electrical problem.
RFI/EMI ISSUES
Anyone who has ever lived near a radio or TV station or near a power generator will likely have experienced this kind of problem. This can also happen in areas with florescent lights, heavy machinery, microwave ovens, computer equipment, large video monitors, or other sundry electrical equipment that can produce radio frequency or electro-magnetic interference.
There are many solutions for such, depending on the source, direction and seriousness of the interference. Shielded cables in your instrument and all cords (including the power cord) may be required. Many guitars are already shielded from RFI/EMI, but many aren't. You can shield them by opening the electronics area and lining it with aluminum or copper tape (available in electronics stores or online).
If you are working with an acoustic or other non-metal bridge guitar, chances are your strings aren't grounded. (Sometimes the bridge/strings aren't grounded in standard electric guitars, if it was built incorrectly or a wire came loose. Always check for string grounding.) In an acoustic, remove the strings and saddle, drill a small hole in the saddle slot and run a grounding wire underneath the saddle (between the saddle and bridge) to your guitar jack. Then replace the plastic or bone saddle with a metal one (brass or aluminim). Metal provides an excellent saddle and will ground every string. Metal saddles to match your guitar are avaialble from most online guitar pro shops.
In the case of an amplifier an inelegant solution is to cover it with aluminum foil. A slightly more elegant solution is to build a "Faraday Cage"-- which is basically a mesh-wire box to surround most of your amplifier. Either method may block interference and allow your amp to work noise-free. You will still need a good-quality shielded guitar cable and power cable.
Note that these are measures for "extreme" situations of electrical interference. Less-extreme is to try to locate the source of interference and increase the distance between that source and your music equipment.
NOISY ELECTRICITY
Sometimes noise is caused by a bad electric line. Basically the quality of electricity coming from your socket is unstable, causing erratic behavior. In such instance the best option is to have an electrician come out and check your house, because such problem can shorten the life of all of your electric appliances.
But for your instruments and amps there are several solutions. The least expensive are voltage regulators or a standard UPS (uninterruptable power supply)-- basically a computer battery backup. A voltage regulator tries to clean up your energy line and can smooth out your current. A UPS puts a battery between your electricity and amplifier, which also acts as a voltage regulator. A UPS is also the very best way to prevent electrical surges and even direct lightning strikes. (There are recorded cases where the UPS was disabled or even melted down, preventing damage to other equipment.) I personally have UPS devices on all of my sensitive electronic equipment.
However, either of these devices may be insufficient for really bad line noise. For such noise you may need a professional musician's line noise filter, which can run a hefty $200 or more. There are many options in this area, so shop around and see what works in your case. Starting with the inexpensive and work up if necessary. Purchasing from a retailer that allows returns in case of failure might be a wise and low-cost solution. If you can get by with a voltage regulator or UPS, that will be your least-expensive answer to this problem.
INSTRUMENT / AMPLIFIER ISSUES
Both instruments and amplifiers degrade with age and need repaired or replaced. Some items are simply built poorly or have a problem develop during the manufacturing process (a weak solder point, bad part, etc). If you perform the basic tests listed above and the noise still persists, you may need to have your equipment tested for noise issues.
This is most easily done through the process of elimination: keep replacing equipment (cords first, instruments, amplifiers) until you find the piece of faulty equipment. Always test cords first; it's amazing how often a problem is simply a matter of a bad connector cord.
An electric guitar can be tested by plugging a different electric guitar into the same amplifier, using the same cord, and seeing if the noise vanishes. If it does, your guitar is the issue.
An amplifier can be tested in the same manner. Have a friend bring over his/her amplifier and test it in the same environment, same electric outlet, same guitar cord and instrument. If the noise persists it's not likely to be the amplifier. If it vanishes you'll have a good hint your amplifier needs repaired or replaced.
SUMMARY
Most causes of hum fall into four areas: jack-related ground loop, electric source ground loop, RFI/EMI problems, equipment issues. These can be tested and fixed at various degrees of expense. Start by performing the easiest tests to isolate the source of the hum / noise and correct that source once it is found.
THE OHM MISCONCEPTION. Whenever we buy guitar pickups, one of the first things we look at is the Ohm rating. The general belief is that the higher the rating, the more "powerful" (louder) the pickup. And to an extent, that can be true. It is at the same time a total misconception of how pickups work... and a misrepresentation of how much power (volume) a pickup can produce.
HOW PICKUPS WORK. Most MAGnetic guitar pickups are created by wrapping copper wire around one or more magnets, and are measured by the Ohm reading from that wire. When ferrous guitar strings (steel, chrome or nickel) vibrate above that coil it disrupts the magnetic field, which causes electrons within the wire to move. This creates electricity... which is then received and significantly increased by your guitar amplifier.
WHY THE OHM MEASUREMENT IS BOGUS. Measuring pickups strictly by ohms is a "cheat figure" the guitar industry uses to make general power ratings easier to understand. The reality is that ohms have nothing to do with the actual power / volume of a pickup. There is a good reason for this: ohms is not a measure of electric flow; is it a measure of electric impedence-- the resistance of the device to the flow of electricity.
In laymen's terms, ohms measure how poorly electricity flows through a wire, not how well.
Why then are ohms used as a pickup rating? Because in general, ohms refer to how much copper is in the pickup coil. The widespread belief is that the more copper wire, the more volume. Yes, all things equal-- if coils are identical, using the same coil shape and the same wire thickness and consistency of coil wrap-- the higher the ohm rating the more powerful the pickup.
However, pickups are not identical. They vary greatly in how they're made, what kind of wire they use, the type of magnets used, how the wire is wound, etc etc. This is why there are so many different kinds of pickups on the market... each boasting its own advantages.
The reality: since amplifiers are designed to increase power and guitar pedals can significantly change the sound of pickup output... "power" is one of the least important of those advantages. Power can be changed external to the pickup. Of far greater importance is basic tone, consistency of sound, degree of distortion, lack of unwanted noise and hum, and general quality of pickup signal. These all join together to form pickup output.
Still, ohms are widely used. Mellow guitar pickups often have ohm ratings between 4.5K and 6K. Humbuckers often run 7K to 9K+. "Hot" pickups (ie heavy metal) sometimes hit 16K or more.
BUT THE REALITY IS THIS: a lot more is involved in making a guitar pickup than wrapping a wire a certain number of times around a magnet (a typical guitar "coil"). There are many variables involved. That is why the field of guitar pickups is so complex and competitive, with everyone claiming to have a "special" pickup.
Those variables are why pickups sound different from one another. If all that was involved was wrapping wire a specific number of times around a magnet... all pickups would sound the same, the only difference being the number of wraps involved.
IS THE OHM / POWER RATING VALID?
In a word: No. The Ohm measurement is accurate... but it has nothing to do with power, output or volume.
This can be proved in three ways:
1) By winding thousands of hair-thin wire coils around a piece of cardboard with no magnet. Then take an ohm reading on that coil. You will getthe same ohm reading as if you had wrapped it around a magnet, no difference... but there will be no sound from that coil-- because despite the Ohm reading, there is no output. So obviously the ohm reading can be misleading.
2) You can sometimes purchase two pickups similarly configured, and the pickup with the lower ohm rating will be louder when played at the same volume as the higher-ohm pickup. (Why would a lower-ohm pickup be louder if ohms were an indication of power?)
3) You can take 40 gauge wire and wrap it 10,000 times around a magnet. Then take 44 gauge wire (far thinner) and wrap that wire 10,000 times around the same size and type of magnet. Realistically speaking, 10,000 wraps of 40 gauge wire will have LOTS more copper than 10,000 wraps of 44 gauge wire. But when you take Ohm readings, the 40 gauge wire will read far lower than the 44 gauge wire. However, when you hook it up to an amplifier, the 40 gauge coil will produce significantly more power than the 44 gauge coil.
Since the 44 gauge coil reads significantly higher Ohms, shouldn't it also have significantly higher volume? No. That's the entire point here. Ohms is a measure of electrical resistance. The smaller wire does not allow electricity to flow as easily as the larger wire, so produces a higher Ohm rating. The larger wire produces a lower Ohm rating but due to its larger size allows far more current to flow. Lower Ohms... but more power.
THE HOUN'PUP PARADOX. Our company once produced a specialty mag pickup called the Houn'Pup that registered zero ohms on a multimeter. Yet it produced significant volume and quality sound. Why? Because of the highly unique way in which it was designed. The pickup received rave reviews. The Houn'Pup was absolute proof of what I'm stating in this article: it is a magnetic coil pickup with zero measurable ohms, yet produces great power and sound. Obviously: ohms does not equate to power.
OUR FLATCAT PICKUP. The FlatCat produces terrific power (60% to 300% greater than competitive pickups). It has received solid 5-star reviews lauding its rich and vibrant output. That's not because of an invalid ohm rating... but because FlatCats are built differently than any other pickup on the market.
The FlatCat is unique. It is a mag pickup, but it is obvously flat, only 1/4" thick. The entire pickup sits directly under the strings.Nothing is stuck inside the guitar body away from the strings. This allows the FlatCat to pick up every bit of energy, every nuance of sound, over a considerably longer string length.
As a result, a FlatCat produces as much "power" (volume and tone) as a full-size pickup. In fact a FlatCat can pick up some sounds a standard humbucker may miss, simply due to proximity to the strings and the way the FlatCat is designed internally. The result is so unique and rich in tone that I use FlatCats on my personal guitars. My customers are amazed at the sound they get from this thin pickup.
SOUND IS SUBJECTIVE
It's difficult to create a scientific measurement of "wonderful sound", because people's ears and tastes differ. What sounds good to one person may not sound as good to another.
FlatCat Pickups are designed to appeal to a wide variety of guitar playing styles and listening preferences. Depending on your playing style, volume settings and the amp you use, FlatCat sound can range from smooth and mellow to overdrive "rock out". FlatCats are very versatile pickups that are enjoyed by musicians world wide.
SUMMARY. Ohms is a measurement of the wire's resistance to the flow of electricity. So how can ohms possibly rate power and volume? The simple truth is, ohms is not a rating of power.
That said, yes, if you're sporting a 17 K pickup you are likely to get some serious power and probably a lot of natural distortion in the process (a "hot" pickup). If you buy a 4.5K pickup it's almost certainly intended for clean, mellow blues and smooth jazz. But as you've read here, that's just a generalization. The best way to judge pickup sound and power is by ear and reading reviews.
True pickup sound is measured not by ohms (impedence in an electrical line), but by resulting power, consistency and tone. The FlatCat definitely produces the power and quality guitarists look for in a high-level pickup-- and does so at a very reasonable price for a custom-wound pickup.
Around the end of 2014 I became aware of flat pickups when I noticed a brand called Thinkbuckers. Looking further I found another brand called FlatPup, another by the Lace company, another brand by National. I was already building guitars by hand and was fascinated by the concept of flat pickups, but could find very little information on how they were built. Even the cigar box guitar communities seemed very secretive (at the time) as to the process.
Research revealed that flat pickups were nothing new; they'd been around for decades. Lace and National produce off-the-shelf models, but they are very pricey.
Gaining little or no cooperation from the community in understanding flat pickup design, I went to the Net and did some research. Very little was found there. So I started experimenting by the seat of my pants, beginning with only a slight inkling of how these were made, based on non-specific photos. Existing pickups were wax potted and wrapped in cellophane packing tape-- a process that didn't appeal to me. I wanted something sturdier and more resistant to environmental changes.
Factory-made flat pickups were pricey, starting at $145 each. I wanted to build a pickup that was especially sturdy and had a wide-range of sound ability, but at a price affordable to the everyday guitar player.
I started developing an unusual design, significantly different than prior designs I had seen.Not a quick process. Hundreds of hours were involved in basic R&D. Dozens of trial pickups. Detailed records were kept on all attempts-- gleaning the best features from each and discarding failures. Eventually, the FlatCat pickup was born.
By mid-2015 the R&D sessions had accomplished several things:
* Considerable improvement over existing design concepts both in construction and resulting sound. Testers stated it sounded better and was more versatile than other pickups.
* FlatCats are fully potted and encased in solid PolyResin, which makes them very sturdy and more immune to elements and the environment.
* Because of their design I was able to create and offer the first low-cost 6-string flat pickup on the market, intended for use on standard electric guitars. Where factory-produced pickups started at $145 and up, FlatCats are priced at $50 to $55. FlatCats extended beyond the realm of cigar box guitars.
* Flatcats were significantly more powerful than existing CBG-type flat pickups. Despite that gain in power, FlatCats remained wonderfully rich in tone, without distortion. They work well with pedals, including distortion and overdrive models.
* FlatCat was released in Cigar Box Guitar and Humbucker footprints. Both models are aboout 1/4" thick and designed to be mounted to the surfaceof a guitar.
FlatCats were released to the market and over the next several months earned solid 5-star reviews. They were purchased by professional luthiers, cigar box guitar builders and customers modding their own off-the-shelf guitars. Repeat purchases by existing customers proved their effectiveness.
FlatCats are often specified as the "pickup of choice" by people who order custom guitars from Wishbringer, with those guitars receiving top reviews as well.
Today the FlatCat is available in a variety of colors. Their sturdy composition assures their continued function over decades-- the wonderfully unique sound available to you for your special guitar projects.
Following are photos of Wishbringer instruments-- Cigar Box Guitars, 6-String Electrics, Amplifiers and other things I've built that are now being used by happy customers. This is to give an idea of what is possible in the custom instrument area.
The Rebelcustom Tele-style guitar, features FlatCat hand-made pickup (center), hand-modified Telecaster-type pickup (more power, greater range than a standard Tele pickup), three on/off pickup switches for instant access to 7 sound combinations, three individual pickup volume controls, master volume and tone (all set in mother of pearl), a Bigsby-style tremolo system, hand-finished pick guard and a fun name tag.
KC Royals Commemorative CBG. Created when the KC Royals won the World Series in 2015. Aluminum "license plate" resonator face, two internal pickups, volume and tone controls, Royals logo hand-pyrographed onto back.
Customer review: Great work! My husband loved the guitar! I asked for a special request for the guitar to be KC Royals themed and the design was perfect. I don't know much about guitars but my husband and his musically inclined family were very impressed!
Petrovsky Telecaster. This customer wanted a Telecaster Affinity turned into his personalized dream instrument. Individual pickup toggles, pearlized pick guard, modified Telecaster single pickup (twice as powerful) and hand-made FlatCat pickup as parts of a balanced 3-pickup set, mother-of-pearl-tipped knobs, individual and master volume controls, tone control, Bigsby-style vibrato and authentic mother-of-pearl name inlay on the neck make this one of the most beautiful guitars I've ever had the joy of customizing.
Bullet Stratocaster Super-mod
This was an experiment to see what could be done with a quality starter guitar. The Bullet Strat is the "low end" of the Fender line, inexpensive and widely available. I started with the Aqua Bullet then replaced all of the pickups with my own selection: my own FlatCat custom-finish at the neck, a dual-rail humbucker in the center, and a heavy humbucker at the bridge. The plain white pick guard was removed and replaced with a pearloid version. The combination makes a very versatile guitar-- and a real beauty. The FlatCat gives this "starter" guitar amazing sound.
FlatCat pickups: These quality, hand-made pickups sit directy under your guitar strings, pulling every bit of resonant sound from your instrument. Works on a wide variety of gutiars, including cigar box guitars, solid bodies, hollow-bodies, resonators and more.
Customer 5-star FlatCat review:
I got a set for a hollow body guitar I made, and I absolutely love these pickups! They have a full, rich sound that stays clear. The bridge pickup does twangy and jangly really well, and the neck has a great big warm sound to it. They're great to play clean, and will do fuzz and distortion equally well. These pickups look cool, are easy to install, and they sound GREAT! I'll be getting more of these in the future. Thank you Wishbringer!
Altoids DulciMint. Three-string dulcimer-fretted one-stick guitar using an Altoids mint tin for a body. Contains an internal transducer pickup and a hand-made FlatCat pickup at the neck as well as volume and tone controls all in that little tin.
Customer review: "Supercool guitar. Sounds amazing - a screaming, stumming machine! First rate build quality. Superior fit and finish. Great communication throughout build process."
Photo Tele: This custom-order consists of a semi-hollow Telecaster-style body, individual volume and master volume controls, a Varitone-style tone switch ranging from clean to distortion to heavy-metal overdrive, modified Telecaster pickup (twice as powerful), custom-made FlatCat and Houn'Pup pickups, vintage-style Teisco vibrato bar, and hand-pyrographed wood photo on the upper left.
Customer gave this guitar a 5-star rating.
Hazardous Voltagecigar box guitar features a light-up front plate and terrific sound.
Customer review: I love my Steampunk Cigar Box Guitar. It is as easy to play as the seller says it is. And it is designed so creatively. I have seen other cigar box guitars but this one stood out to me and I had to have it. It arrived already tuned and ready to play. It even included a slide and a pick. I am very happy with my purchase.
Mustang fretless. Two custom-finish FlatCat pickups, phase switching, volume and tone. Beautiful red metal flake finish, with three hand-pyrographed mustang horses on the neck:
Note: I ordinarily don't recommend ordering a fretless 6-string unless you've played one before and like the results. They're a bit... different.
Four Aceswas my very first CBG sale, a multi-pickup sound monster with a resultant very-pleased 5-star review from the customer:
Customer review: AWESOME CBG!!!!!!!! I would would buy another one in a heart beat!!!!!!!Thank you so much🎸👀🎸👀🎼🎼
GitRicky Surf-Green Tele. Gorgeous Telecaster-style with pearlized pick guard, Bigsby-style tremolo and three pickups including a custom-modified Tele pickup, standard Tele bridge pickup and hand-made FlatCat center.
Customer review: "A very fine, and beautiful guitar. The finish is a work of art. The guitar plays like butter, would put this up against any big name instrument. I would look up Wishbringer for any custom work."
ElectraGlide. This beautiful hand-pyrographed (wood-burned) CBG featured my very first hand-made guitar pickup-- the prototype that lead to production of the popular FlatCat series.
Portable Wedge Steampunk Amplifier. Packing a lot of power into a 3.5-inch speaker, the Wedge has volume, tone and overdrive controls, runs on AC or battery and a versatile sound range.
Customer review: A great item. A lot of utility in a nice package. Plenty loud for what it is intended.
Les Paul Custom: This customer wanted a basic FlatCat pickup and cosmetic upgrade to this red dye Les Paul guitar. Sound is fantastic.
Mild Insanity.This off-the-wall CBG has an intentionally-angled neck, pyrographic neck and face designs, mag pickup and lap-guitar style.
Sea Mist. This Tele-style guitar is my own personal instrument. My initial jump into hand-made full-size electric guitars, the paint job alone contains some 20 coats. With four individually-switchable pickups (FlatCat, P-90, Lipstick Tube and Humbucker), a pyrographed neck and Bigsby-style tremolo, this is the ultimate "does everything" guitar.
Creator's personal guitar.
Classic Cigar Box Guitar. Custom creation for a friend, this fretless CBG has beautiful acoustic sound as well as electronics built in, hand-pyrographed front and hand-painted neck.
Custom Jaguar. Customer wanted a simplified Jaguar-style guitar with custom P-90 and Humbucker pickups. Customization included hand-cut pearloid plate and true mother-of-pearl control knobs.
Customer review: I seriously cannot put into words how much I love this guitar. Wishbringer built me exactly what I was looking for, a sturdy, beautiful, and fantastic sounding instrument that I would be happy to use for any function, whether it's in the studio, on stage, or just playing around in my bedroom. This guitar is beautiful, the picture hardly does it justice, it almost shimmers in person. The tone is phenomenal, perfect, warm where I want it to be warm and bright where I want it to be bright. The actual feel of this guitar is... well stunning. I was shocked at how natural it felt in my hands, it felt like it might as well have been an extra extension to my body. String action makes the instrument extremely easy to play, as advertised, while still maintaining beautiful resonance.
Steampunk Amp. This portable amp runs on AC current or batteries and features twin 4" speakers along with volume, tone and bass overdrive controls. The hand-inlaid speaker cover wires and corner protectors along with antique handle adds charm to this hobby-box amplifier. Multiple apertures produce excellent acoustic sound.
Eastern Song. This tenor Ukulele features a hand-painted front, oriental metal decorations and a beautiful drawer-handle string anchor. The customer loves the unique sound and ukulele fingering.
Customer review: This is by far the most unique ukulele I have ever seen! It has a slightly different sound than a classic tenor, but that's what makes me love it even more. : )
Archtop Electric. This is an (estimated) 1950s archtop that was in pretty bad condition when I got it. Replaced the fretboard with inlaid mother of pearl, patched, sanded and repainted from a mottled brown to light ivory color, added gold-tone hardware and a FlatCat pickup system to top off the mix. The decades-old wood and total hollow-body structure produces wonderful tone and resonance.
Right click and "Open Image in New Tab" for a closer look.
I had a change of mind on this one. I started out with this to see how it would sound. The trick was a dowel that runs under the bridge to allow the back to resonate through the very open front. (Left click photo to enlarge.)
The original design:
This is the revision. I replaced the top with inner-magnet attached side panels, and "brassed it up". Added a rustic finish and inner workings to turn it into a 5-voice guitar.
Note: If ordering a FlatCat pickup, please see the end of this article for information.
DEFINITIONS
POLARITY: The facing of the magnet, either "north up" (toward the strings) or "south up".
PHASE: The direction of the current... which wire is + or --, "hot" or "ground".
INSTALLING A NEW PICKUP
If you're just using one pickup on an instrument, you usually do not have to worry about polarity or phase. But if you're using 2 or 3 pickups in close proximity to one another, how those pickups are built can be very important to how they will work together.
Some pickups are compatible; some are not. If you've ever experienced hum you just can't seem to get rid of, or weak, tinny sound... it is possible your pickups are out of polarity/phase with one another.
Out of phase means the pickup wires are hooked up backwards in the guitar. Intentionally done and balanced, this can provide a pleasantly different tone on your guitar. Done unintentionally, it can result in severe loss of volume and tone.
Here is a diagram illustrating how phase works:
WIRE COLORS
While different guitar companies will have charts regarding pickups, there is no universal color coding for pickup wires; it sometimes is necessary to check it yourself. The rule of thumb is this: If you hook a pickup to your volume control and it sounds weak or tinny, reverse the wires. A functional pickup should sound vibrant and not at all weak.
If you're using a humbucker (2 coils) you may have either 2 or 4 wires coming from the pickup, depending on the model. In the case of 4 wires, there will be two pairs. In such case you will need to check the wires for continuity to see which of the four wires is paired together. Time saver: on many 4-wire pickups the ground wires are already soldered together.
COMPATIBILITY.Generally speaking, if you have two single pickups, you want one to be North, phase positive and the other one to be South, phase negative (ie, wound the opposite direction of the first pickup). This is what you call a matched pair, which is important for not only hum and noise cancellation but also for volume and tone.
If you have a mismatched pair, you can wind up with either hum or a weak, tinny-sounding signal. This being the case, it is possible for two pickups to be mismatched... incompatible. This means they are either both north, both south, or are wound the same direction.
TESTING POLARITY
You will need a compass or a bar magnet. Set the compass sideways on top of the pickup and see whether the north or south pointer of the compass points away from the pickup.
Opposites attract; a north polarity pickup will attract the south pole of a compass, repelling the north pole and causing it to point away from the pickup. So if the north points away from the pickup, it's a north polarity pickup. If the south points away it is a south polarity pickup.
The polarity of the pickup is indicated by the side of the compass needle pointing away from the pickup.
You can use a bar magnet as well. See whether the north end or south end of the bar magnet is attracted by the pickup. If one end is attracted by your pickup, the other end is the polarity direction.
TESTINGCONTINUITY
Testing for continuity (unbroken circuit) checks two things:
1) Continuity indicates the pickup is functional (continuous coil wire without a break)
2) If there are 4 or more wires it will reveal which wire pairs match one another.
Using a multimeter, touch the meter leads to two wires and see if you get current flow. If you do, those are paired. In the case where two wires are already soldered together, those are ground and the other wires are "hot".
TESTING PICKUP PHASE (which wire is + or -- )
You will need a digital multi-meter that is capable of testing very low DC or AC voltage (either will work). Most multi-meters can do this, even inexpensive ones.
To determine the phase, connect your two meter leads to a wire pair. Now take a screwdriver or large nail and slowly move it toward the surface of the pickup. You will see a jump in the voltage reading; that jump will either be positive or negative. If it is positive, you have the red (hot) and ground (black) leads on the correct wires. If it is negative, you have them reversed. Switch them and try again for verification.
When you remove the screwdriver from the pickup you will see another voltage spike, just the opposite of the first one. So if you got a positive reading when laying on, you will get a negative reading when pulling away, and vice versa.
That is how you test for phase. When you get a positive-then-negative reaction, whichever wire the red lead is connected to will be the hot / positive wire and the black wire is ground / negative.
INSTALLING COMPATIBLE PICKUPS
To get ideal sound you want your pickups hooked up backward to one another. If both pickups are wound the same direction or the magnets facing the same direction, you can get hum. For pickups to be matched, you want the magnets to face opposite directions and the coils to be wound opposite (or in short, you want opposite polarity and phase between the pickups).
Note: if the magnets are 2 inches or more away from one another you likely will not need to worry about polarity; they are outside one another's magnetic field. You will still need to consider phase.
If you buy a set of pickups and one says "neck" and the other says "bridge"... that has already been taken into consideration. If you take two neck pickups and put them together or two bridge pickups together, you are likely going to have out-of-phase (incompatible) pickups-- unless of course that's the sound you're going for.
What makes things more confusing is that different brands of pickups and even different years within the same brand can be incompatible. For example, early Fender neck pickups had north polarity, but then they later changed to south polarity. So to replace pickups on a Strat you need to either test for polarity and phase on the existing pickups-- or switch out all three with an already-matched set.
HOW CAN I TELL IF MY PHASE IS RIGHT?
It's easy to check polarity, as shown above. If you hook up a pickup and it sounds weak or tinny, it may be a phase issue. Try reversing the wires: note where they connect to the controls, and switch them. This will require knowledge of soldering technique.
Some guitars have phase switches which can automatically change the phase for you. They are also often used to intentionally change the sound of a guitar.
For cigar box guitars you will probably usually use only one pickup, next to the neck. If you use two or three make sure you use a matched set.
INSTALLING A FLATCAT
FlatCat pickups come north-polarity toward the neck, positve phase unless otherwise requested. If you need south-polarity, as with most humbuckers simply turn the FlatCat 180 degrees (with the numbers on the back away from the neck). If the FlatCat will be 2 inches or more away from existing pickups they will likely work fine, without further testing. But if combined with other pickups in close proximity, testing your guitar for polarity and phase compatibility is a good idea. Because of the FlatCat's unique internal design, coil direction is not an issue.
WITH ALL PICKUPS- EARS ARE A GREAT TOOL
To test for phase-- hook the indicated ground wire to the ground of your volume control and the hot wire to the hot pin. If it doesn't sound right (weak or tinny sound) your instrument may require inverted phase. Just reverse the wire placement on the pot. If you still experince weak sound, look to other areas of the guitar for problem issues (weak pot, poor grounding, bad solder joint, phase/polarity issues in other pickups, bad jack or guitar cord, etc). Some instruments require professional maintenance.
--o--
REFERENCE PHOTOS
These photos are just for general reference. As indicated above, your guitar may be different. It is easy to check polarity with a compass or magnet.
CUSTOMER REVIEWS: "Man You are a genius. Just arrived and just installed. They are great! No noise no hum, great tone and volume. I don't know how you did it but they are better than most traditional pickups." - Andrea
"Love it. Great tone. Not one bit of crackle, hum, or feedback, even when turned up on high." - RP
A professional luthier stated: "This has such a balanced sound. It brings out a full bass end without losing the trebles, and has almost an acoustic sub-tone to it. It's a great pickup."
The FlatCat brings out all of the strings evenly, applying proper bass to the wound strings and volume to the trebles without sounding tinny in the process. The result is a harmonious balance between all strings.
NOTHING SPEAKS BETTER THAN VIDEOS! See the end of this page for video listings.
WHAT ARE FLATCATS? FlatCat's are surface-mounted, anti-noise guitar pickups. They are only 1/4" thick but have significantly more power than competitive pickups. They are coil-based "mag" pickups (just like other electric guitar pickups) but are designed in a very special way, developed over years of testing to maximize voice, tone and string balance. Easy-installation instructions and mounting is included. Each FlatCat is built totally by hand in the U.S.A., with free support for your questions.
WHY ARE FLATCATS SPECIAL? Most pickups are largely buried inside the guitar body, with the primary sensory field a distance away from the strings and carried up through the body via small pins (requiring precise alignment).
The entire FlatCat pickup sits right under the strings; there are no pins. The active field of the FlatCat covers the face of the pickup, accessing far more string area and producing a more accurate sound that can't be obtained from standard pickups. Place a FlatCat at the neck position and the resulting sound is rich and vibrant. Put it near the bridge for more of a "surf / lead guitar" sound. Install two or three FlatCats with a switch as with any standard pickup combo.
FLATCAT FEATURES:
* Surface-mount: installs quickly and easily without routing the body
* Only 1/4" thick, beautiful molten black finish
* Provides up to 3 times the power of other flat pickups
* The full pickup surface is receptive-- no need to worry about "pin alignment"
* Not microphonic; a true noiseless coil mag pickup
* Entire pickup sits directly under the strings, reproducing every nuance of sound
* Sound is clear and accurate, producing a unique rich, full "Delta Swamp" tone
* Potted in sturdy, solid polymer (instead of wax and tape)-- immune to weather changes
* Anti-hum and anti-noise
* Works well with all amps-- very versatile range
* Completely and expertly hand-made in Missouri, U.S.A.
* Solid 5-star ratings from our customers
* A hand-made custom pickup that is less expensive than many off-the-shelf pickups
FlatCat works with standard electric guitars, cigar box guitars (CBGs), and other electric-string instruments (steel, nickel or chrome strings). The unique design produces especially fine tone and sound range beyond conventional pickups (see the diagram in the additional photos). FlatCats are available in CBG, 6/7-string, and two bass guitar models (standard 4 string electric and CBG bass).
SIZE SPECIFICATIONS * 6 / 7 string and bass guitar: 3 3/4" x 1 7/8"... the size of an industry-standard humbucker with mounting ring (The size is to cover mounting screw holes if they already exist in the guitar.) * CBG (cigar box guitar) or CBG bass: 2" x 2"
(Note: Two CBG bass pickups can be used as a split pair for a 5-string bass guitar)
EFFECTIVE FIELD WIDTHS(distance between outer strings) The effective pickup field on standard and bass versions is 3" wide-- plenty of room for most guitars. The effective field on the CBG version is 1.5"-- more than wide enough to handle CBGs with 3 to 4 strings. The standard version can be installed on a CBG as well.
MORE CUSTOMER COMMENTS
"I LOVE THESE PICKUPS! They sound amazing!! I just tried the new full size pickups and they really crank it out!! THANKS SO MUCH." -- Rocket Instruments
"I finally finished the guitar for which I bought your pickups and have had several players over to try it. Everyone agrees your pickups sound great. They lived up to every claim you make and then some." -- R. Duke
"It has a very unique sound, to me it sounds somewhere between a P-90 and a Strat pickup, but more laid back than either. Very easy to install, and well built. Excellent customer service." - G.W.
"I got a set for a hollow body guitar I made, and I absolutely love these pickups! They have a full, rich sound that stays clear. The bridge pickup does twangy and jangly really well, and the neck has a great big warm sound to it. They're great to play clean, and will do fuzz and distortion equally well. These pickups look cool, are easy to install, and they sound GREAT! I'll be getting more of these in the future." -- K. Jewett
Read our reviews on Etsy for additional 5-star comments from enthusiastic customers.
CUSTOMERS please send me your photos and YouTube video links of your FlatCat instruments in action. I love to see finished customer work-- and often post them on this website!
Best wishes from Wishbringer!
VIDEO DEMOS of the FLATCAT PICKUP: Performer Brooks Williams performing in a duo at the huge Shrewsbury Folk Festival, the FlatCat prominent on his prized resonator guitar (start the video about 13 minutes): https://youtu.be/fQzSzoR6ryw?t=826
FlatCat is a Trademark of Wishbringer Traditional Music. All rights reserved.
SHIPPING NOTES: Once a product leaves U.S. borders, it is out of the jurisdiction of U.S. shipping law. Under the Covid situation, Foreign quarantine laws and delay times differ for each country. You will have a USPS tracking number, but that system often provides contradictory information even within U.S. borders. Your shipment will be insured, so if the item has not arrived within 60 days (14 days within the US) we can initiate replacement. Thank you for your consideration of these unusual times.
RETURN POLICY For detailed return policies please see the CONTACT section on the Home page. Each FlatCat is hand-tested prior to shipping to guarantee proper function and quality sound. I'm confident you will be very satisfied with your purchase.
Most CBGs use "open chord" tuning, which means you are able to play a set of 3 or more notes by placing your finger or slide across all the strings at the same spot on the neck.
Most cigar box guitars are tuned to one of three keys (although there are many other options):
G-D-g (using guitar strings A, D and G)
D-A-d (using guitar strings D, G and e)
E-A-e or E-a-e (see * below)
The lowest string is the key your guitar is tuned to. G-D-g is the key of G, D-A-d the key of D.
Four-string CBGs expand options greatly, including not only standard CBG tuning but also any 4-string instrument one prefers: tenor guitar, bass guitar, low 6-string guitar (EADG), high 6-string (DGbe), ukulele, mandolin and even violin. Common 4-string CBG tuning is GDgd or GDgb. Or, you can leave the lower string off and play it as a 3-string CBG. 4-string CBGs are very versatile instruments.
STANDARD CBG TUNING without a tuner
Tune the first (heaviest) string to whatever sounds and feels right. This should usually be a little lower and looser than you think it should be. The 2nd string (middle) is tuned the same as the 7th fret on the 1st string. The 3rd string (thinnest) is tuned to the 5th fret of the 2nd string. If you have a 4-string CBG, the 4th string is tuned to the 7th fret of the 3rd string. If you have a piano, tuning pipe or harmonica, you can tune to played notes.
NOT JUST 3 STRINGS
CBGs aren't limited to 3 or 4 strings. Some have 6 strings, like a regular guitar. Some have only two or even one string (called a "Diddley Bow"). Two Diddley Bows can be tuned to harmonic notes (G,D) and the players can automatically harmonize with each other by playing the same neck positions.
CBGs are extremely versatile instruments and are remarkably easy to get started playing. Among CBG players and builders there is one common rule: "There are no rules." That's part of what makes Cigar Box Guitars so much fun: their widespread individuality and unique nature.
--o--
* EAE tuning. EAE is a unique tuning that can be done two ways:
E-A-e using the E-A lower strings and e treble. This is good for emphasizing the low end and "second-guitar" strumming.
E-a-e used the E low string, and the b & e trebles (tuning the b down one whole note to a). This offers a unique mixture of a really low string along with two trebles. This can be good for lead guitar playing or use of a slide.
Standard tuning of a CBG is G-D-g. But don't be afraid to try alternate tunings for different sounds. CBG enthusiasts often own more than one guitar, each tuned differently. Some have 3 strings, some 4, some the standard guitar 6. It is a very versatile instrument.
Due to issues with Covid and individual country shipping and quarrantine policies, Wishbringer cannot be held responsible for orders once they leave the U.S. Postal service tracking is unreliable and stops at U.S. borders. We recommend foreign customers have products shipped to a U.S. address if possible, then arrange for your preferrred shipping from there. There are no returns or refunds on overseas orders, even if item is damaged in shipping. In short, overseas shipping was risky before Covid, and is even more unreliable now. We wish to provide our customers this fair notice. Customer assumes all responsibility for deliveries outside the U.S., as we cannot guarantee individual country policies or delivery procedure.
GENERAL RETURN POLICY
All Wishbringer items are hand-made, hand-tested and fully functional when they go out the door. Returns for exchange with identical item is allowed in case of shipping damage only.
In all the years Wishbringer has been in business we've not once seen a legitimate "it doesn't work" return. Post-sale support is 100%. Wishbringer sells quality products and we wish you to be fully satisfied with your purchase... as indicated by our 5-star customer reviews.
Wishbringer takes great care in production quality and tests all items before shipping. Our instruments are designed to last for decades and thanded down to the next generation.
HOW TO PLAY A CIGAR BOX GUITAR in ten minutes or less!
What first attracted me to cigar box guitars was how easy they are to play. I have played 6-string classical/folk guitar for years, written dozens of songs, produced and marketed three CDs... yet the simplicity of this instrument fascinates me.
I was browsing YouTube one day and came across this video:
(Go ahead and watch it. It's only 4 minutes long.)
So the CBG is an instrument that just about anyone can play regardless of musical background. This delighted me because we've all heard someone say "I wish I could play an instrument but never learned how." Maybe you've said that yourself. The CBG offers an introduction to music without years of practice... and encourages improvement of skills as you learn more songs.
Cigar box guitars are a foot in the door that can bring years of playing enjoyment without requiring rigorous study. They are truly the heart of folk music... but versatile enough to play any style from blues to jazz to rock n' roll.
Most of us have seen a dulcimer, a lap-instrument that is played using a wood peg and a pick. I've always liked these instruments, but they use a diatonic scale (7 whole notes). The CBG is chromatic (all musical notes) and can have from 1 to 6 strings (most have 3 or 4). These are tuned so that a "chord" can be played by placing a finger across all strings at the same place(called "barring" the chord). The instrument is so versatile that almost any song can be played using this method.
NUMBERED FRETS
This method is so easy that CBG players often "write" their music using numbers rather than notes or chords. No matter what your git is tuned to, you can play a song literally by the numbers. On the neck we start with the nut as zero, followed by fret 1, 2, 3 and so on.
This in mind, see if you can figure out what song this is by playing it on your CBG (answer at the bottom of this post)
** means pause, 0 means open string
9-9-7 ** 9-9-7 ** 9-9-7-5-3-3-3-3-3 * 0
PICKING OUT YOUR SONGS
It is easy to pick out songs by ear. Just sing the song and bar different frets until it sounds right, changing chords as the song seems to need a change. It can seem tricky if you're just starting out, but gets easier as time goes along. For those who suffer from being tone deaf, there's always guitar music---
"READING" GUITAR MUSIC
You can tell what chords are on the CBG by the fret number. In the key of G (where the thickest string is a G note) these are:
O 1 2 3 4 5 6 7 8 9 10 11 12
G G# A A# B C C# D D# E F F# G
Most guitar music has chord signatures above the music. These signatures will look something like this:
C D G7 Am C D F Em C
All of these represent full chords that are played on a 6-string guitar.
On a CBG however, because of the harmonic tuning you can drop the secondary signature (7, m) and just play the main chords:
C D G A C D F E C
It usually still sounds right. So that simplifies things to start with.
When you know where the chords are on the CBG (it doesn't take long to learn them; there are only 13), you can actually read and play standard guitar music books... without the months or years of practice necessary to learn standard guitar chord fingering. Just place your finger across all the strings at the positions shown above, and there are your chords. It's like a dulcimer on steroids!
MOVE IT UP A NOTCH
Now that you have the bascs, you can expand your tuning and playing skills with one little, fantastic trick:
Tune your guitar to D-A-F. Alternate tunings are C-G-d# or G-D-Bb
Here is a really neat video that shows why this works. It's well worth watching. The link below starts playing at 2min 16sec to avoid the unnecessary stuff. Note this video is in regard to 4-string tuning, but can be just as easily used for 3-string. It is my personal favorite tuning and playing method.
There is of course a lot more you can learn about playing a CBG. You can learn fingered chords and rifts and all sorts of things as you gain experience. But to get started, to my knowledge there is no easier stringed instrument in the world. Not only that... but cigar box guitars sound wonderful (especially when amplified), they are great conversation pieces, and they're just plain fun.

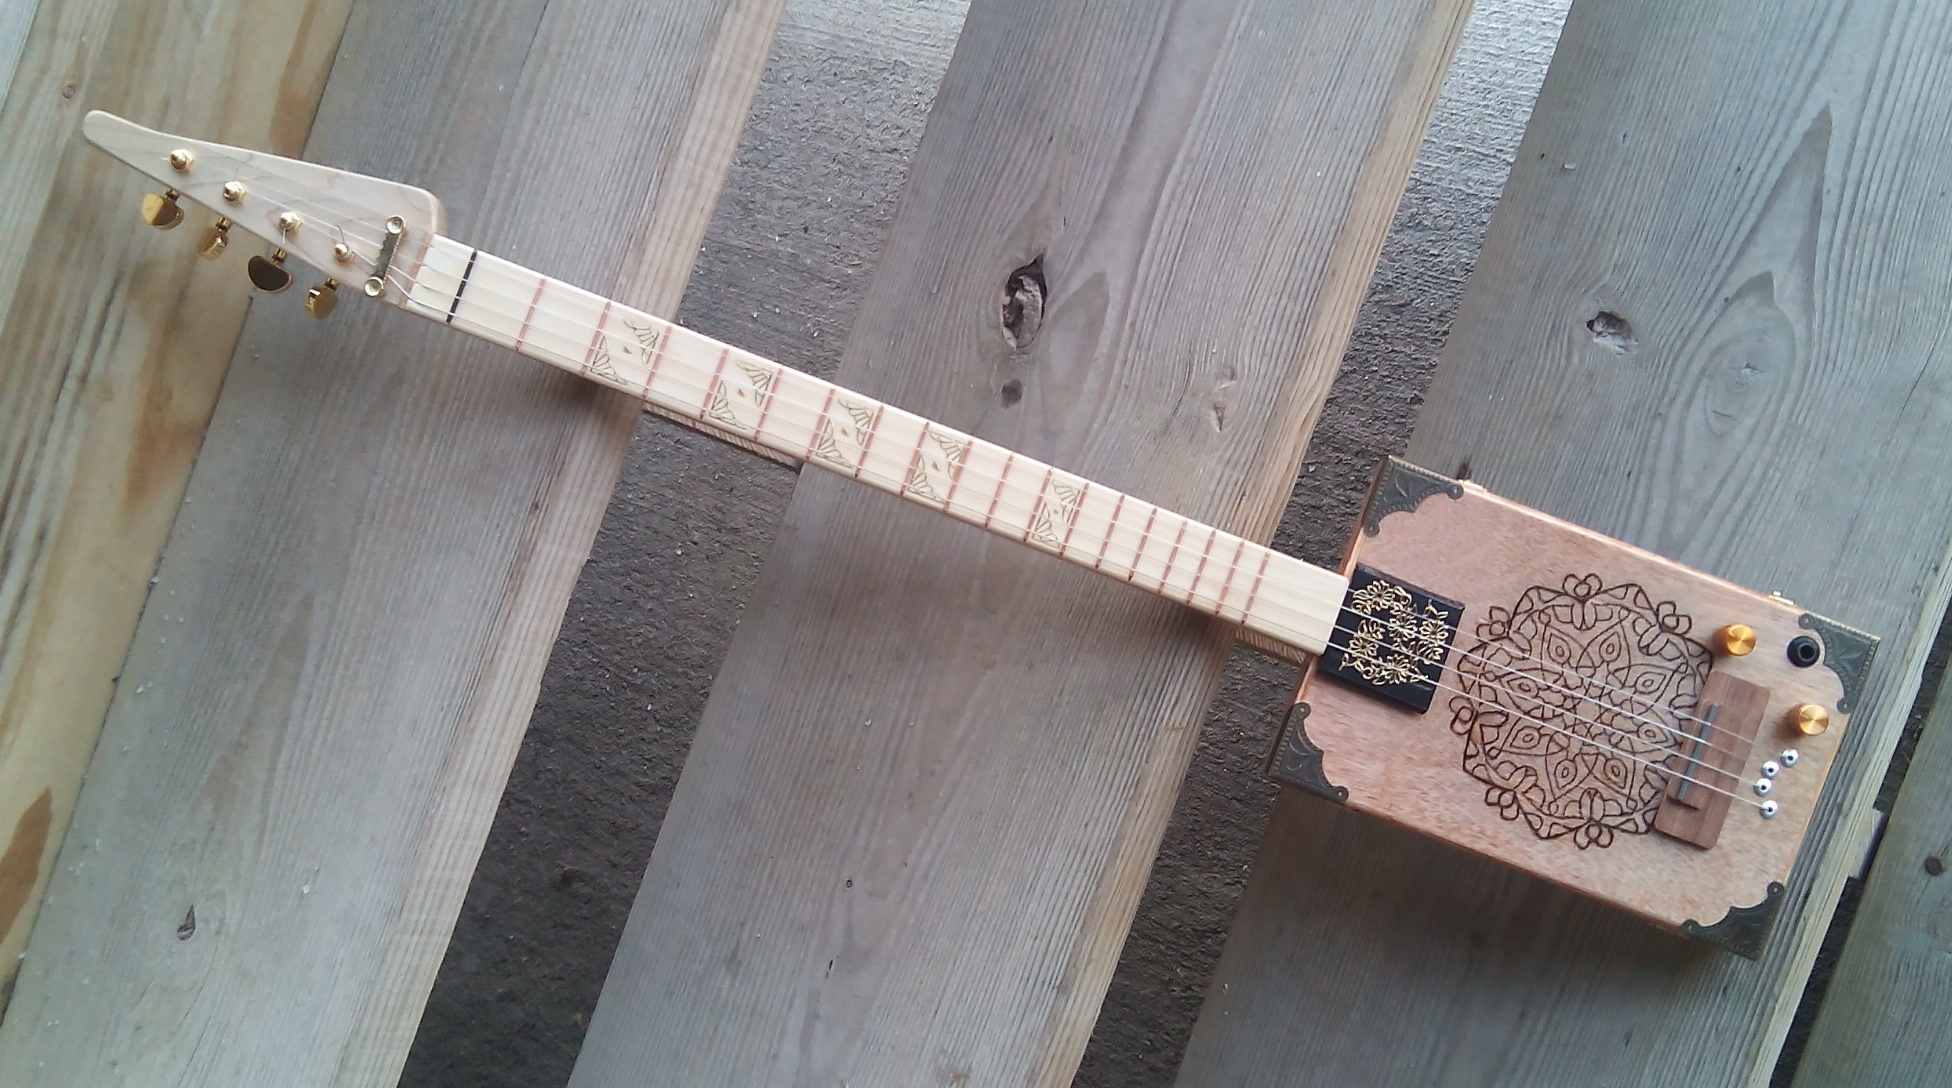
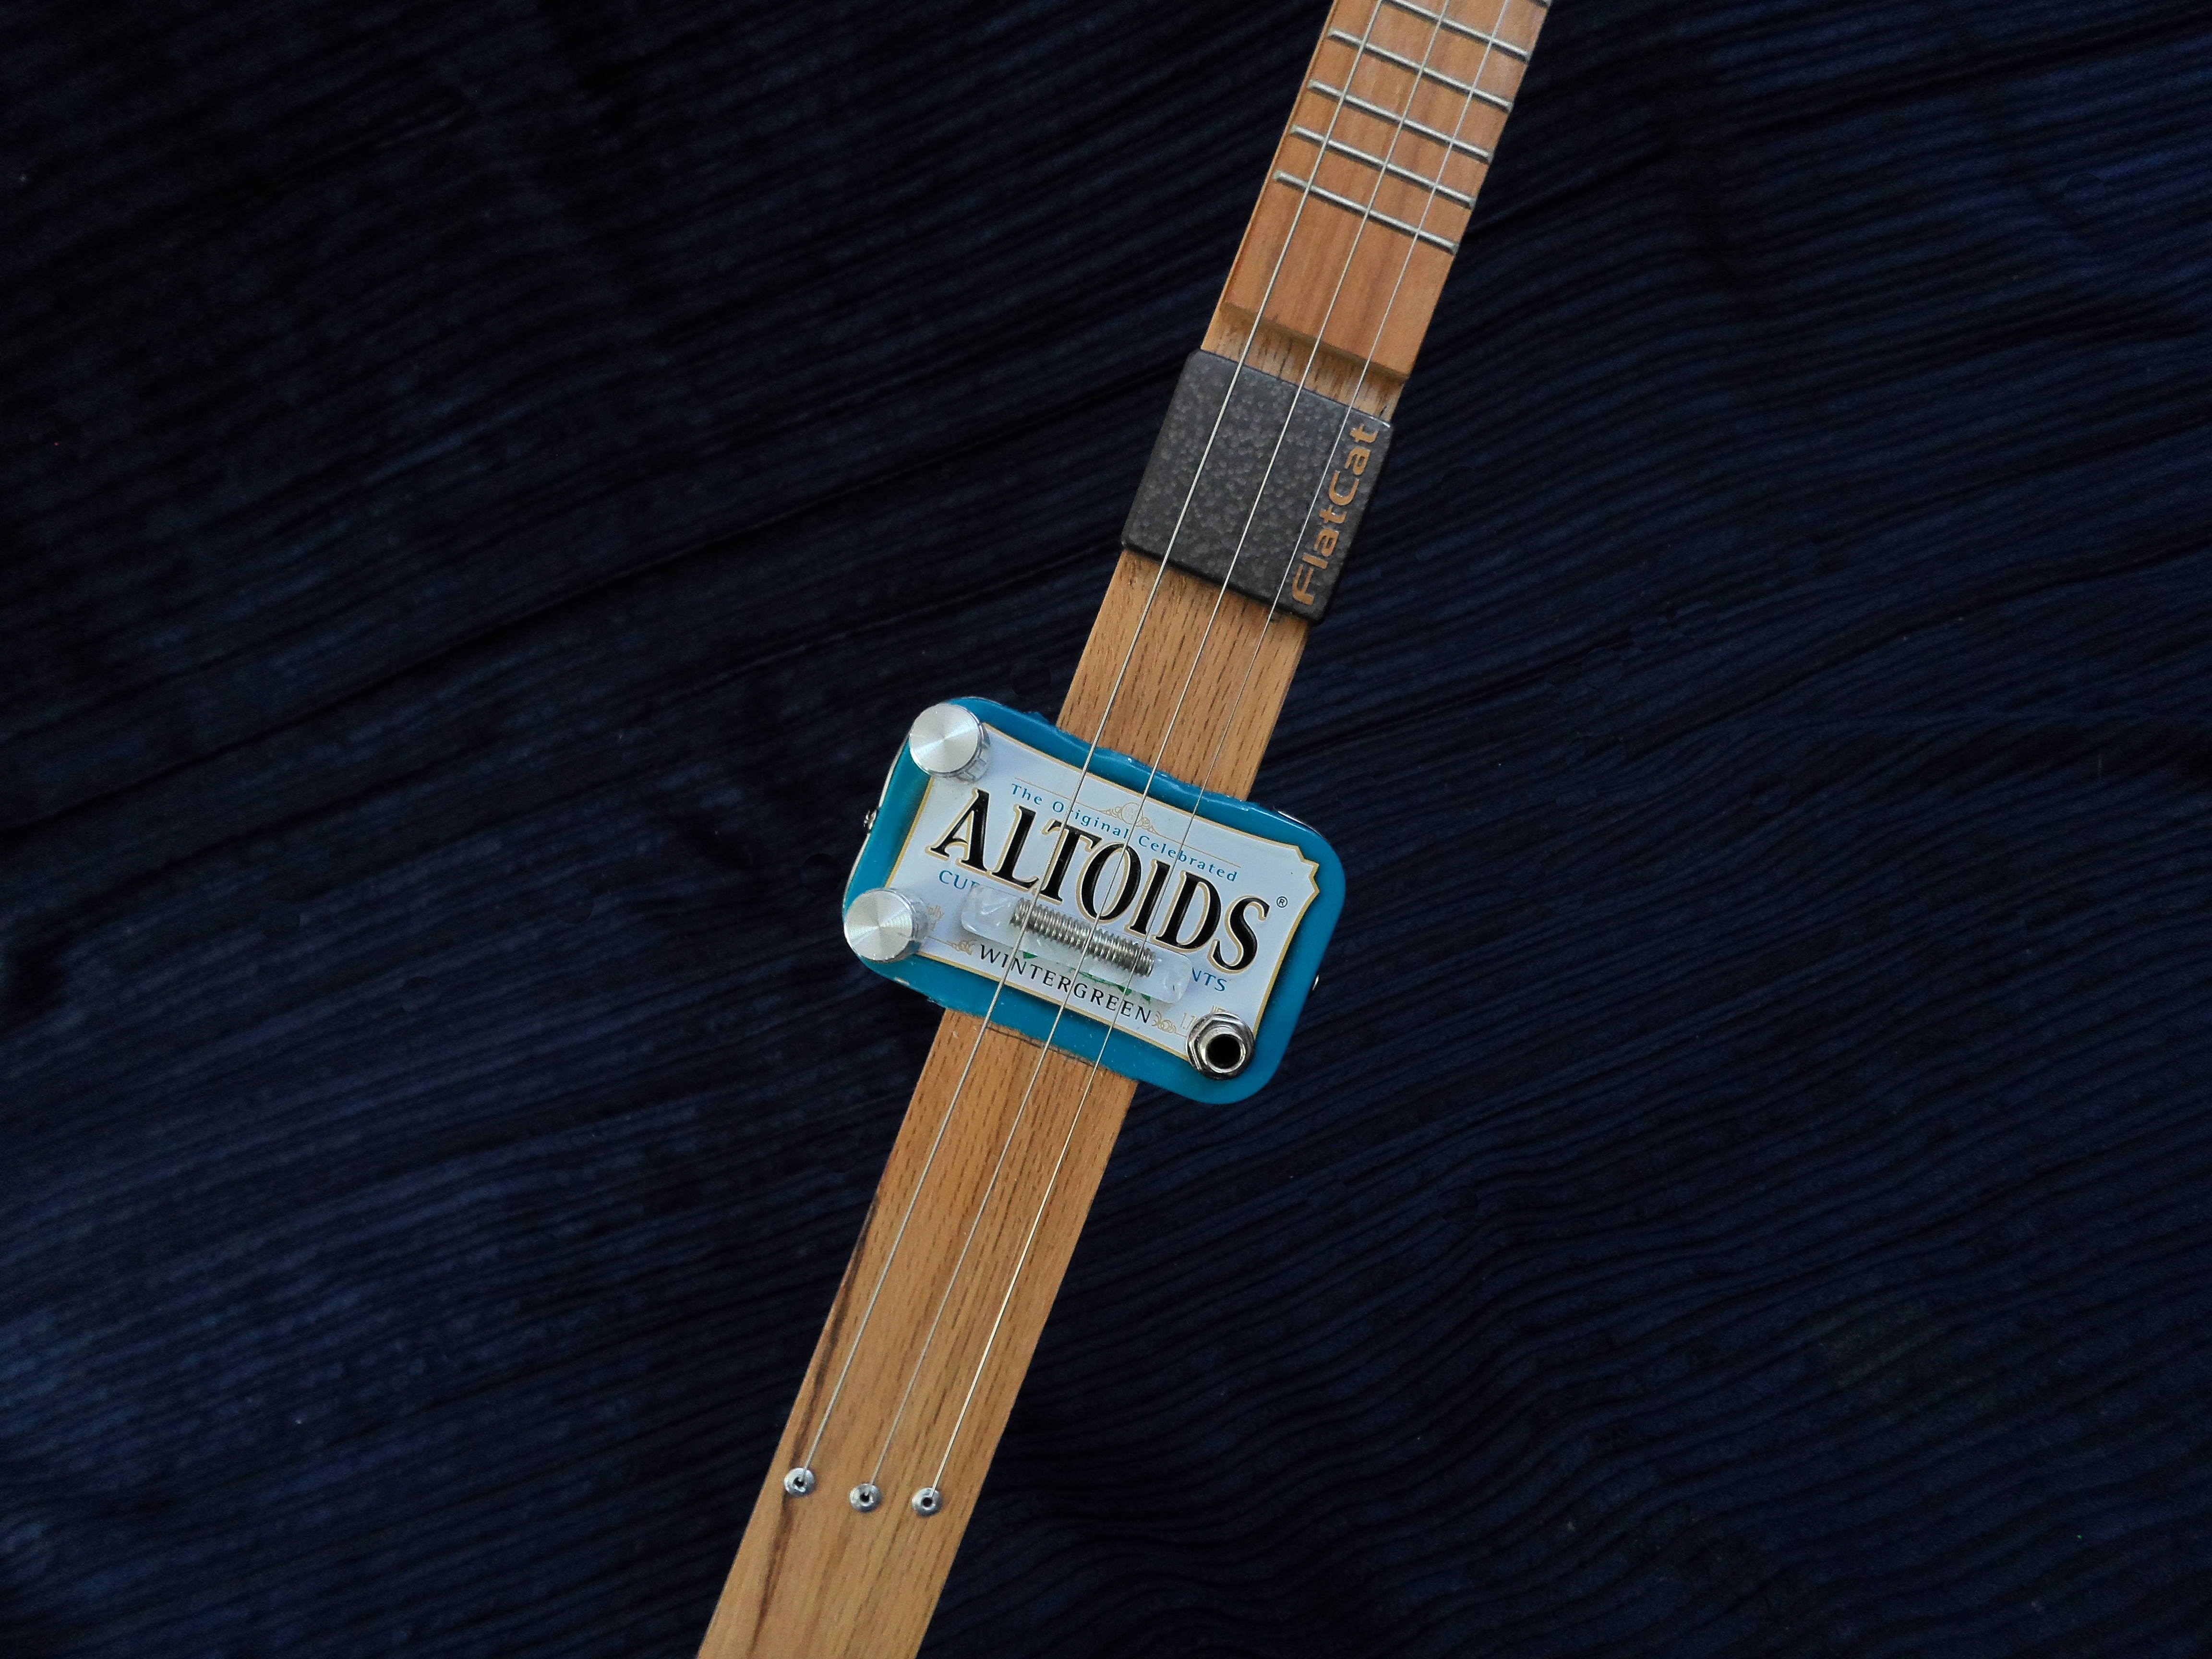
_-_smaller.jpg)


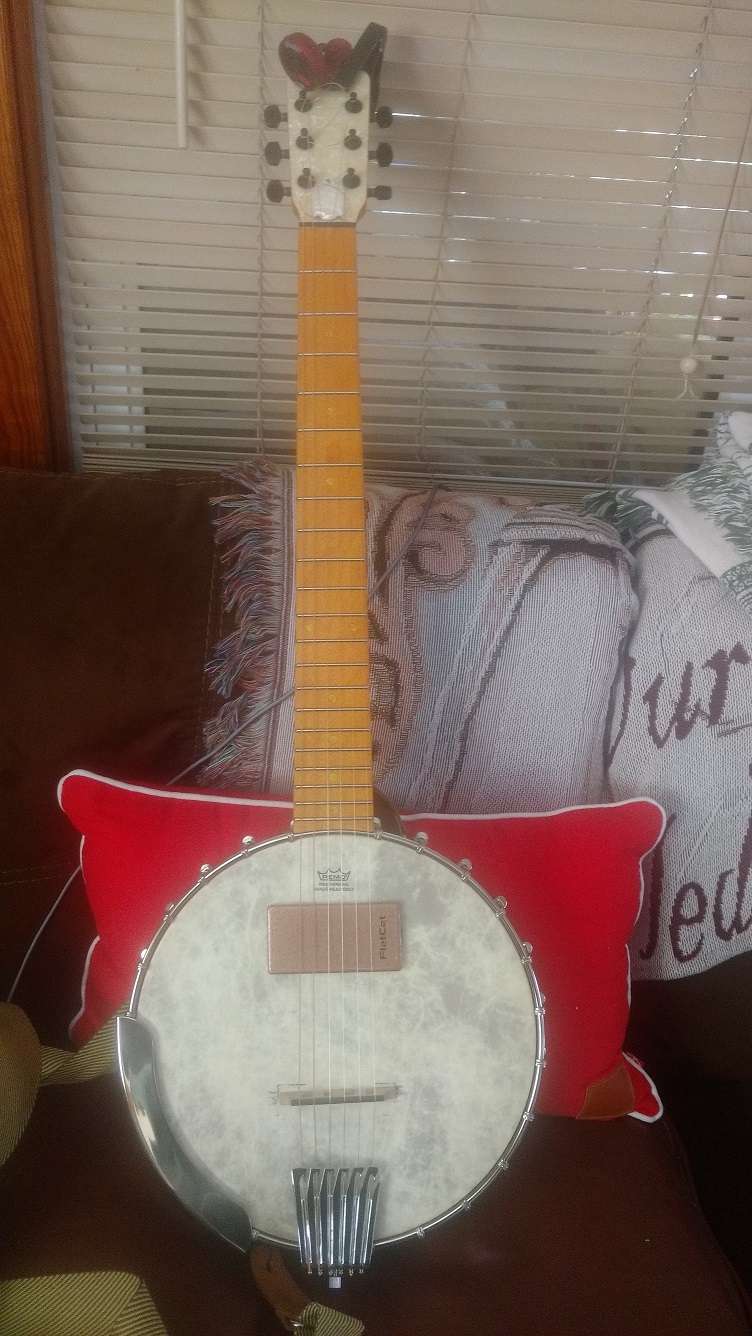
.jpg)

.jpg)
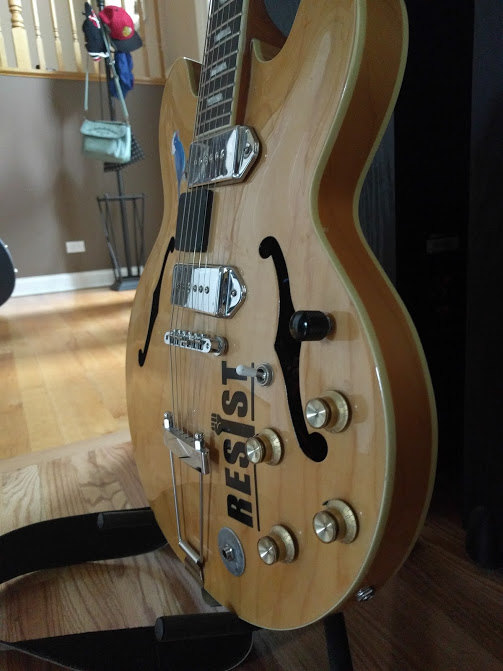
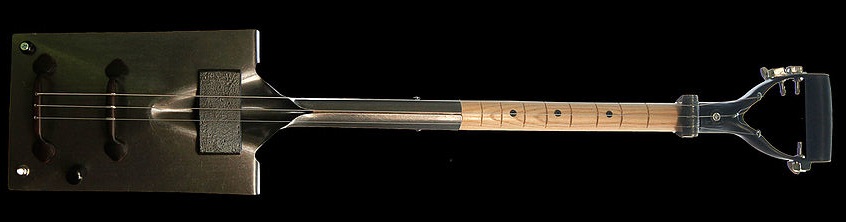
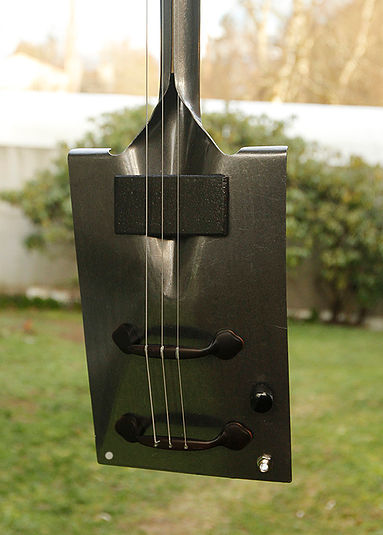
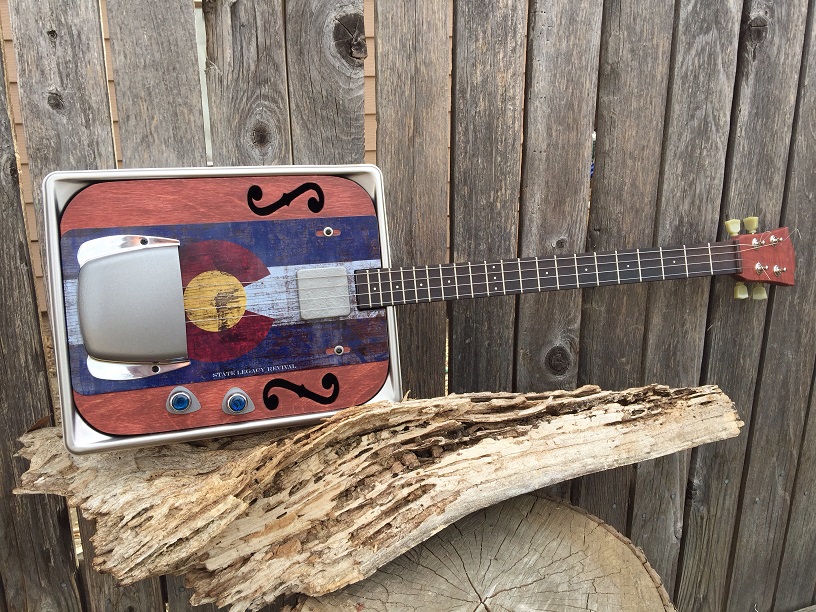

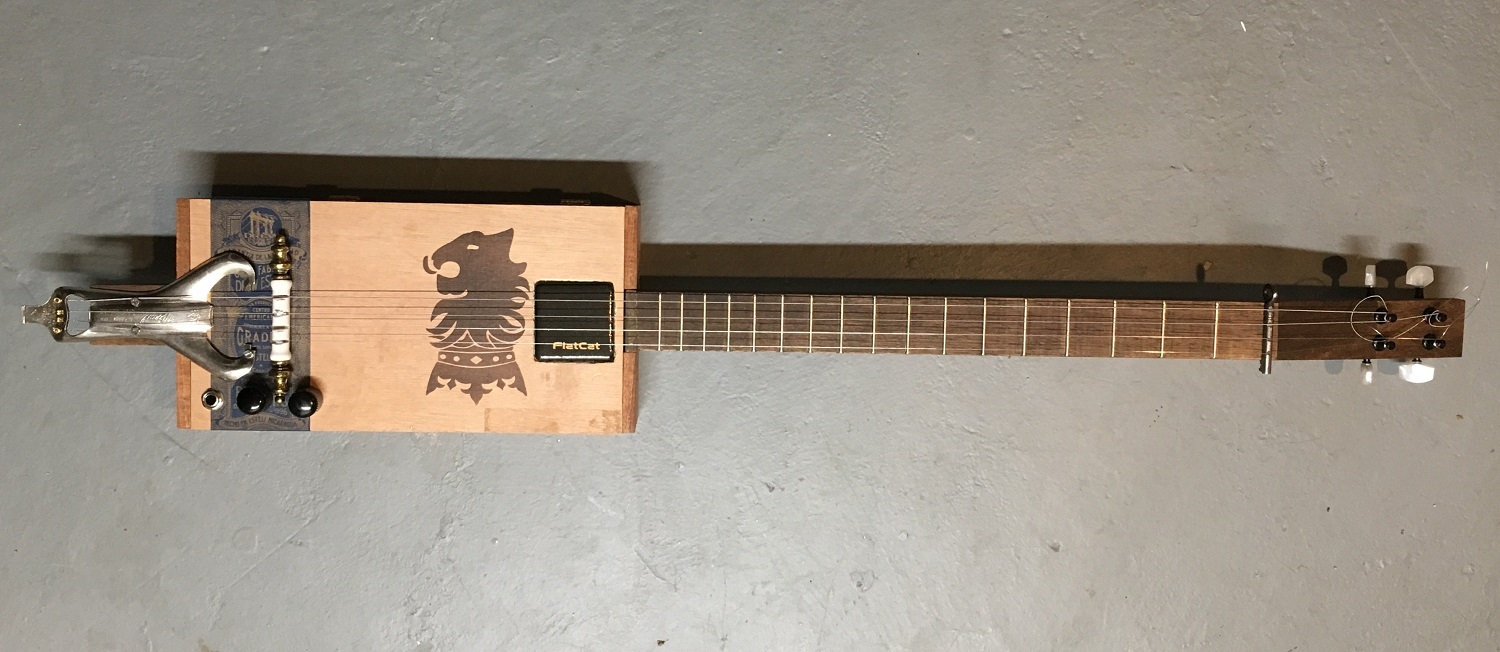
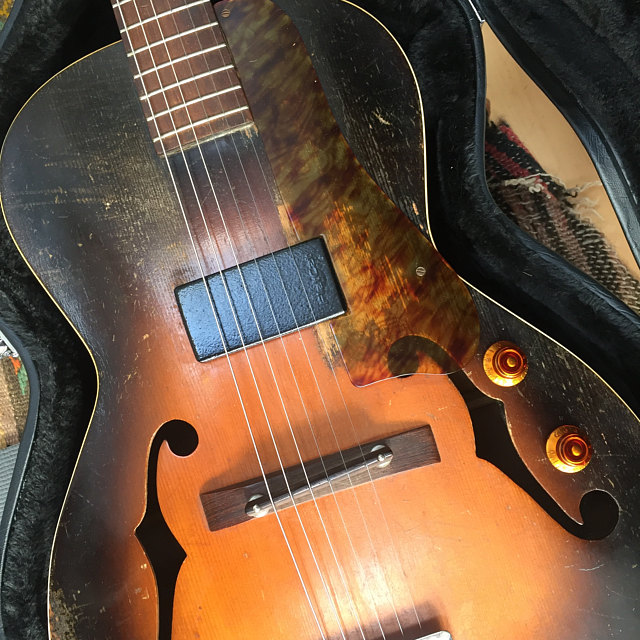
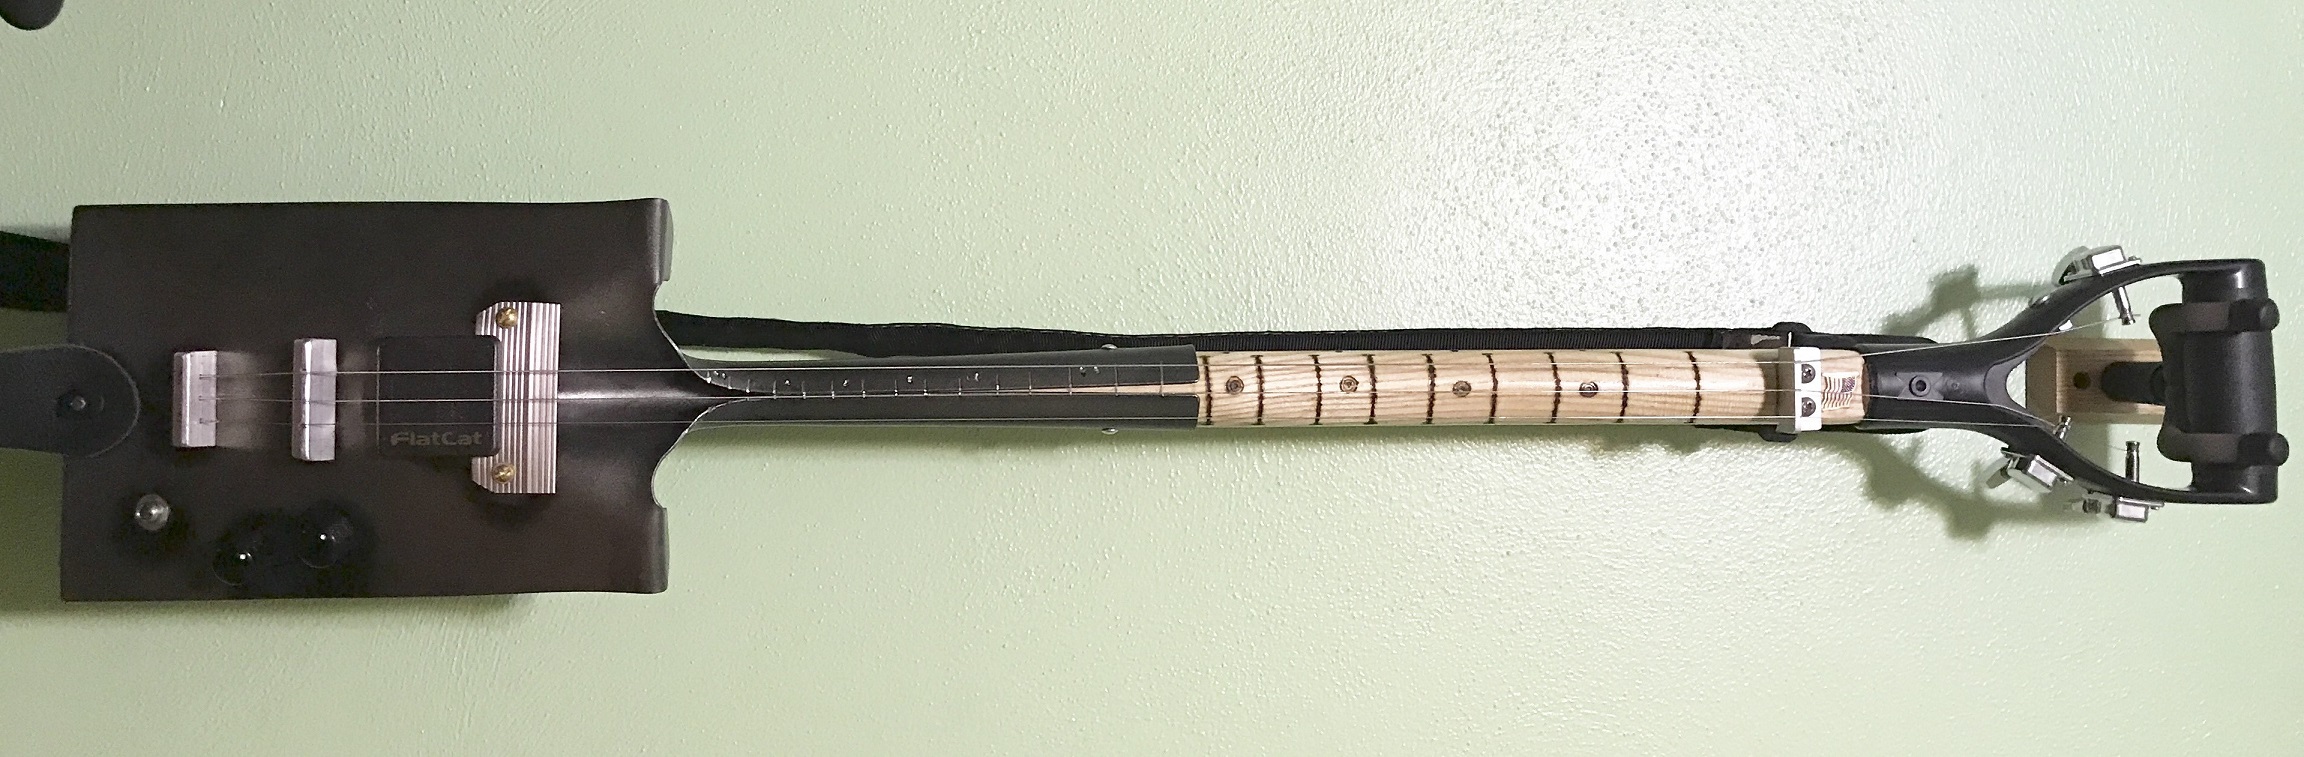
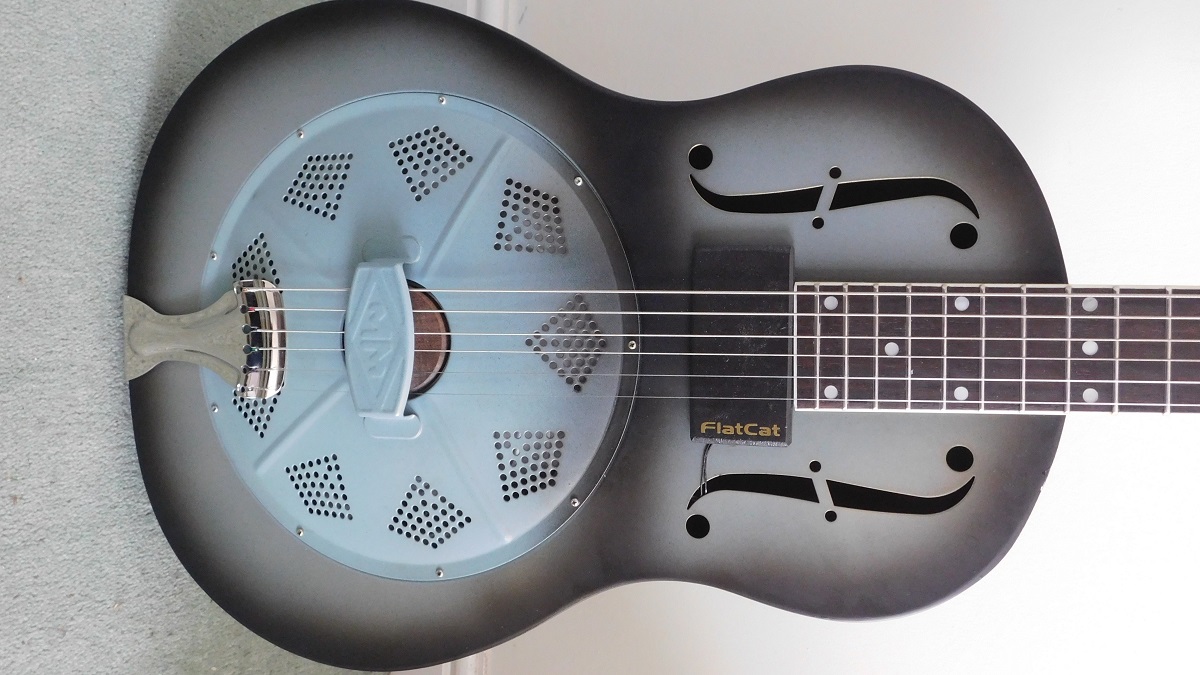
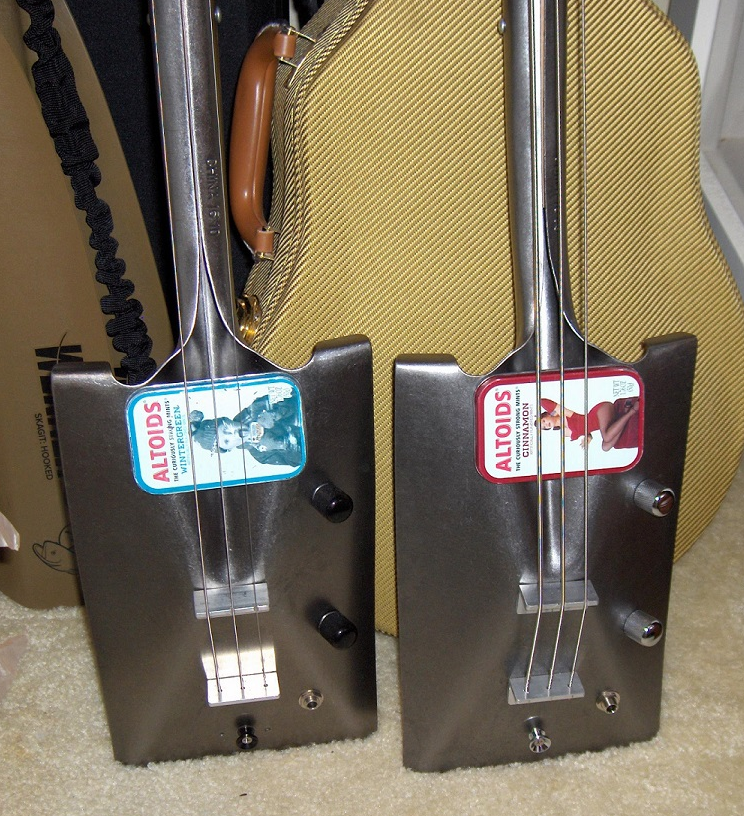
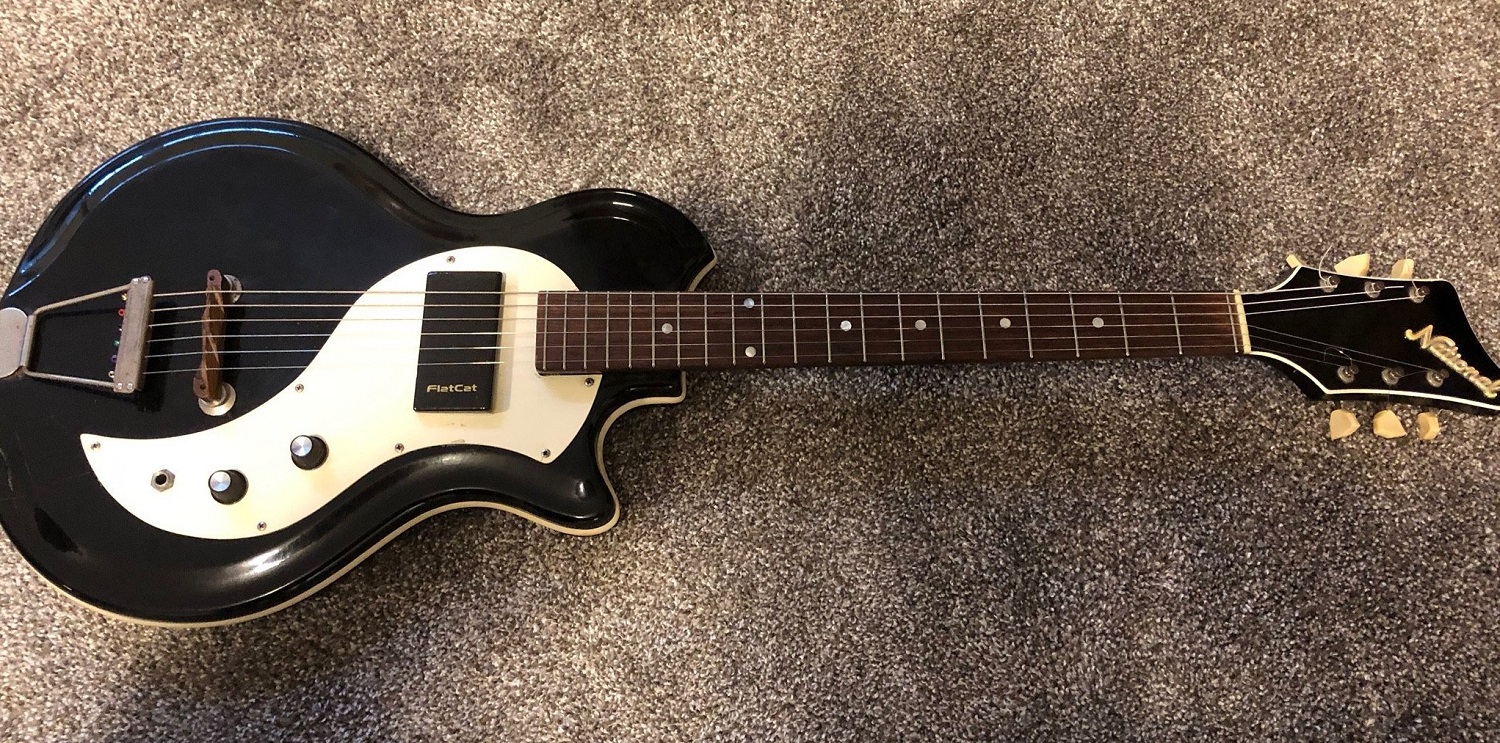
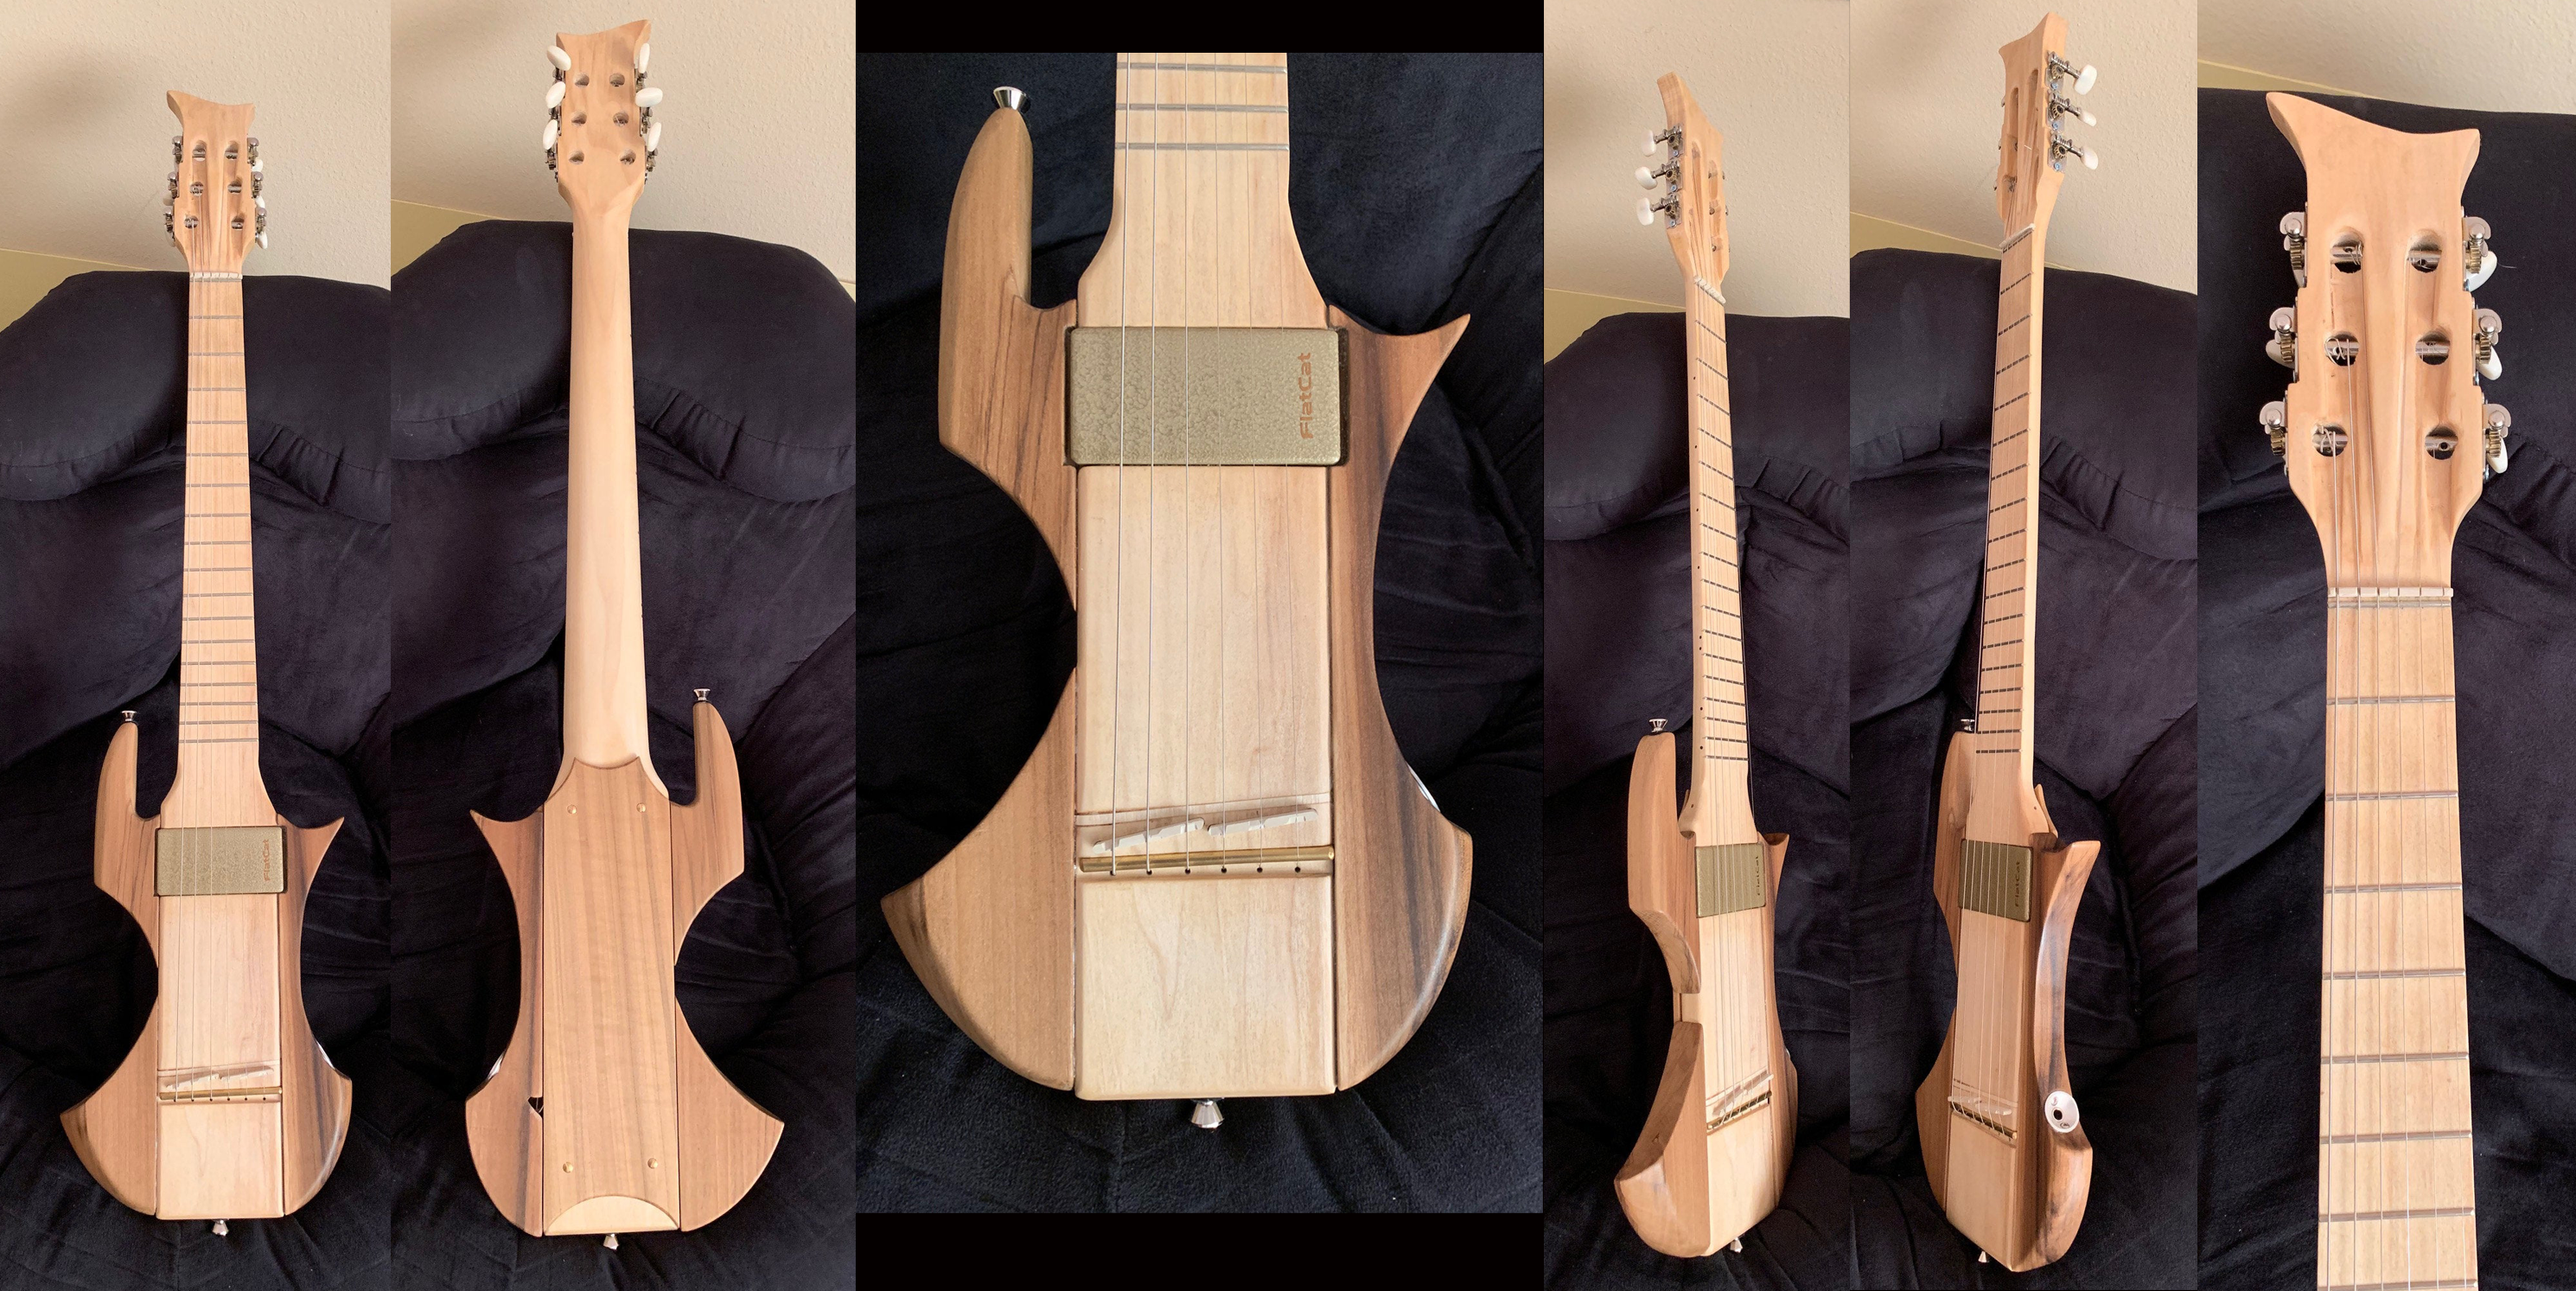
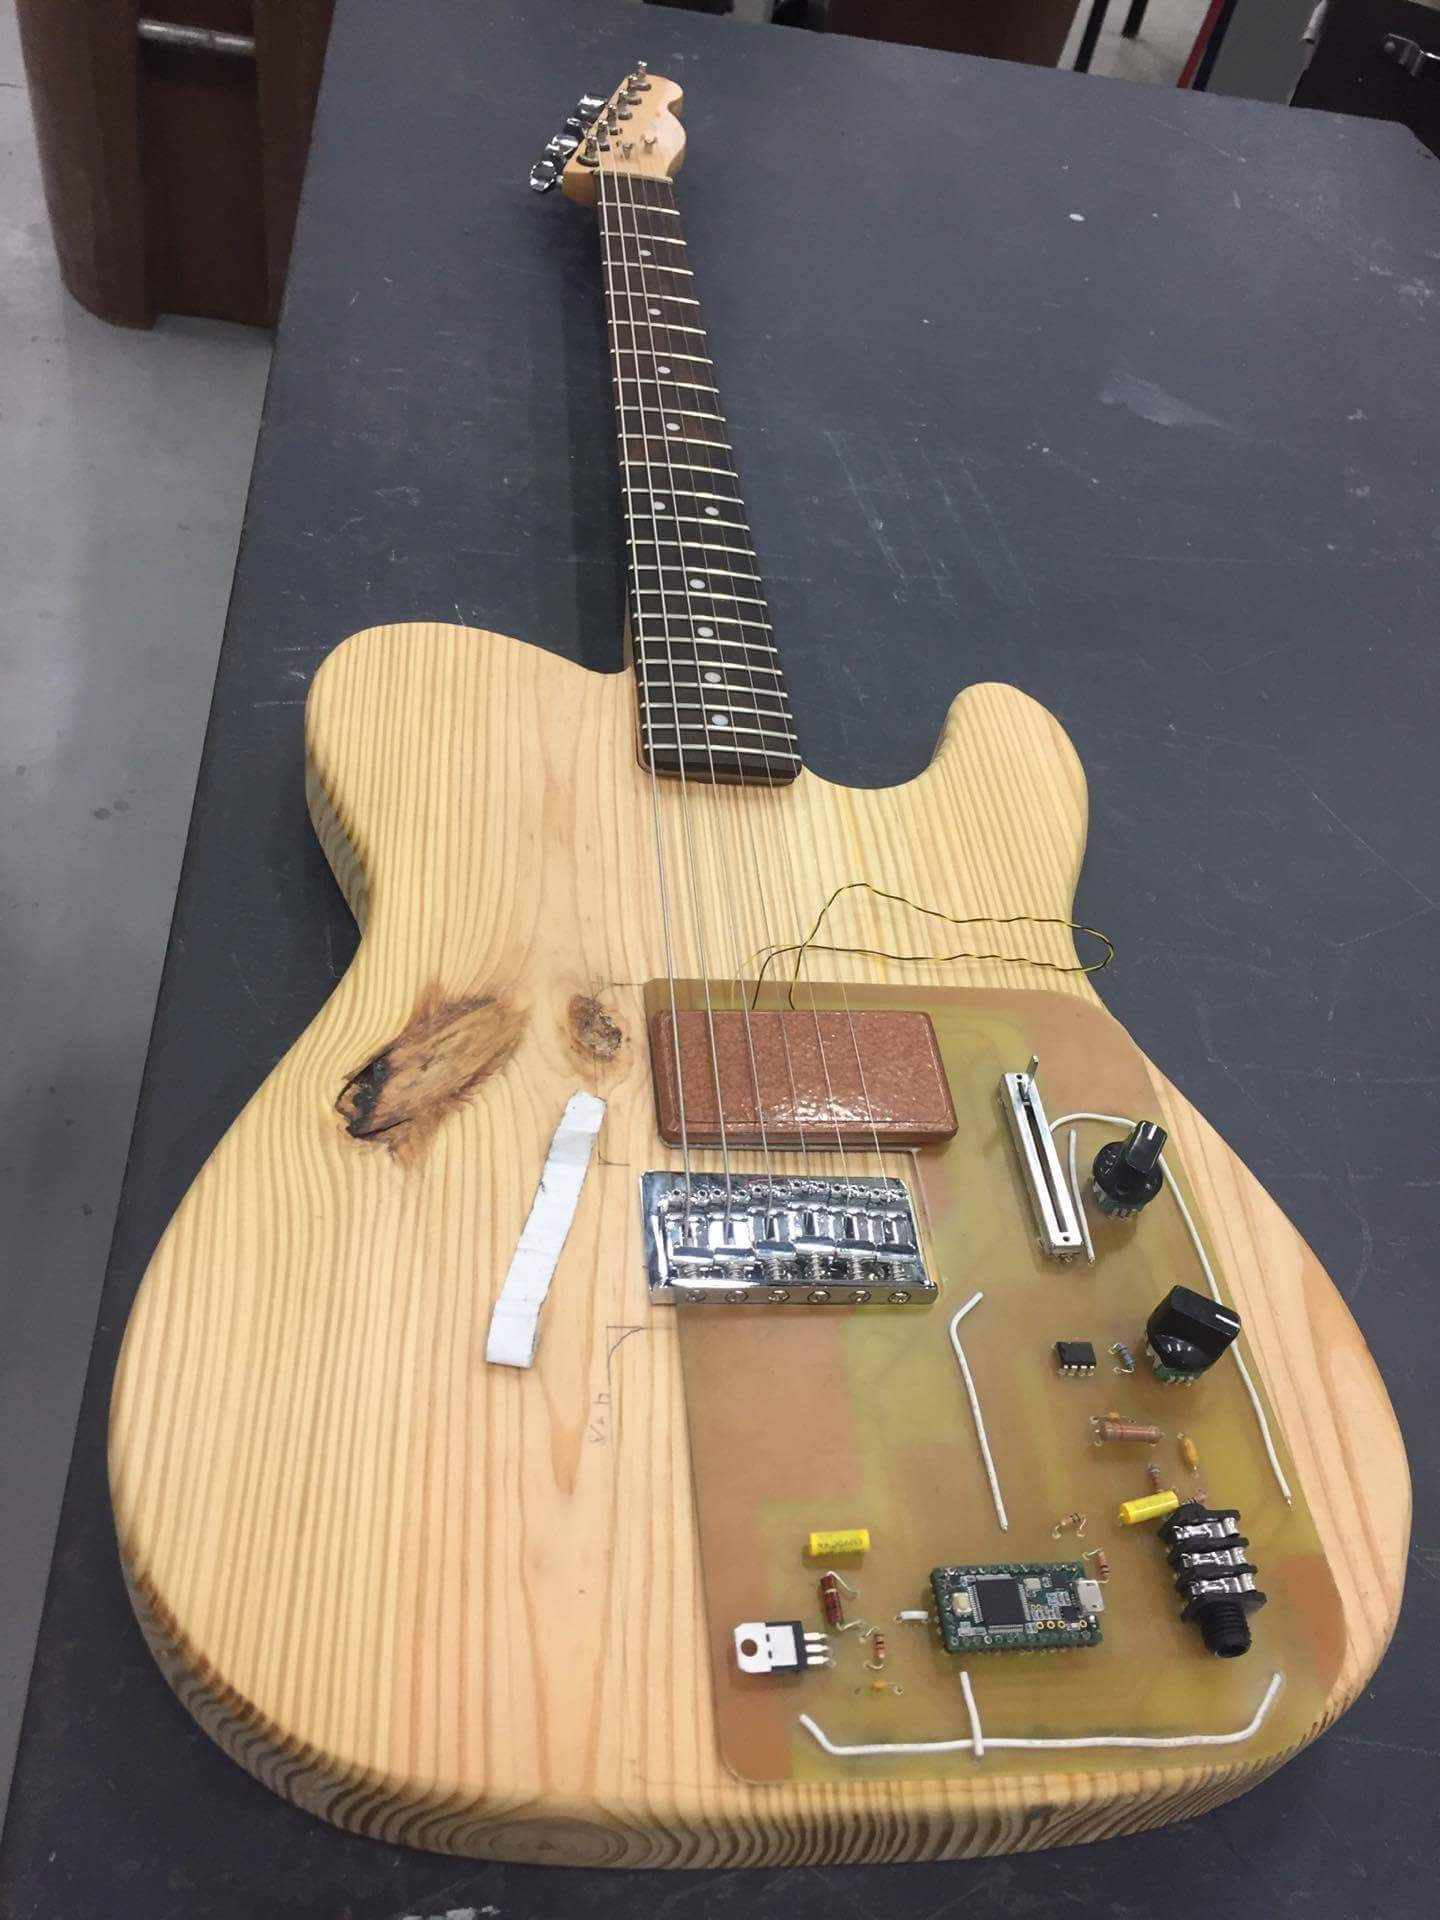
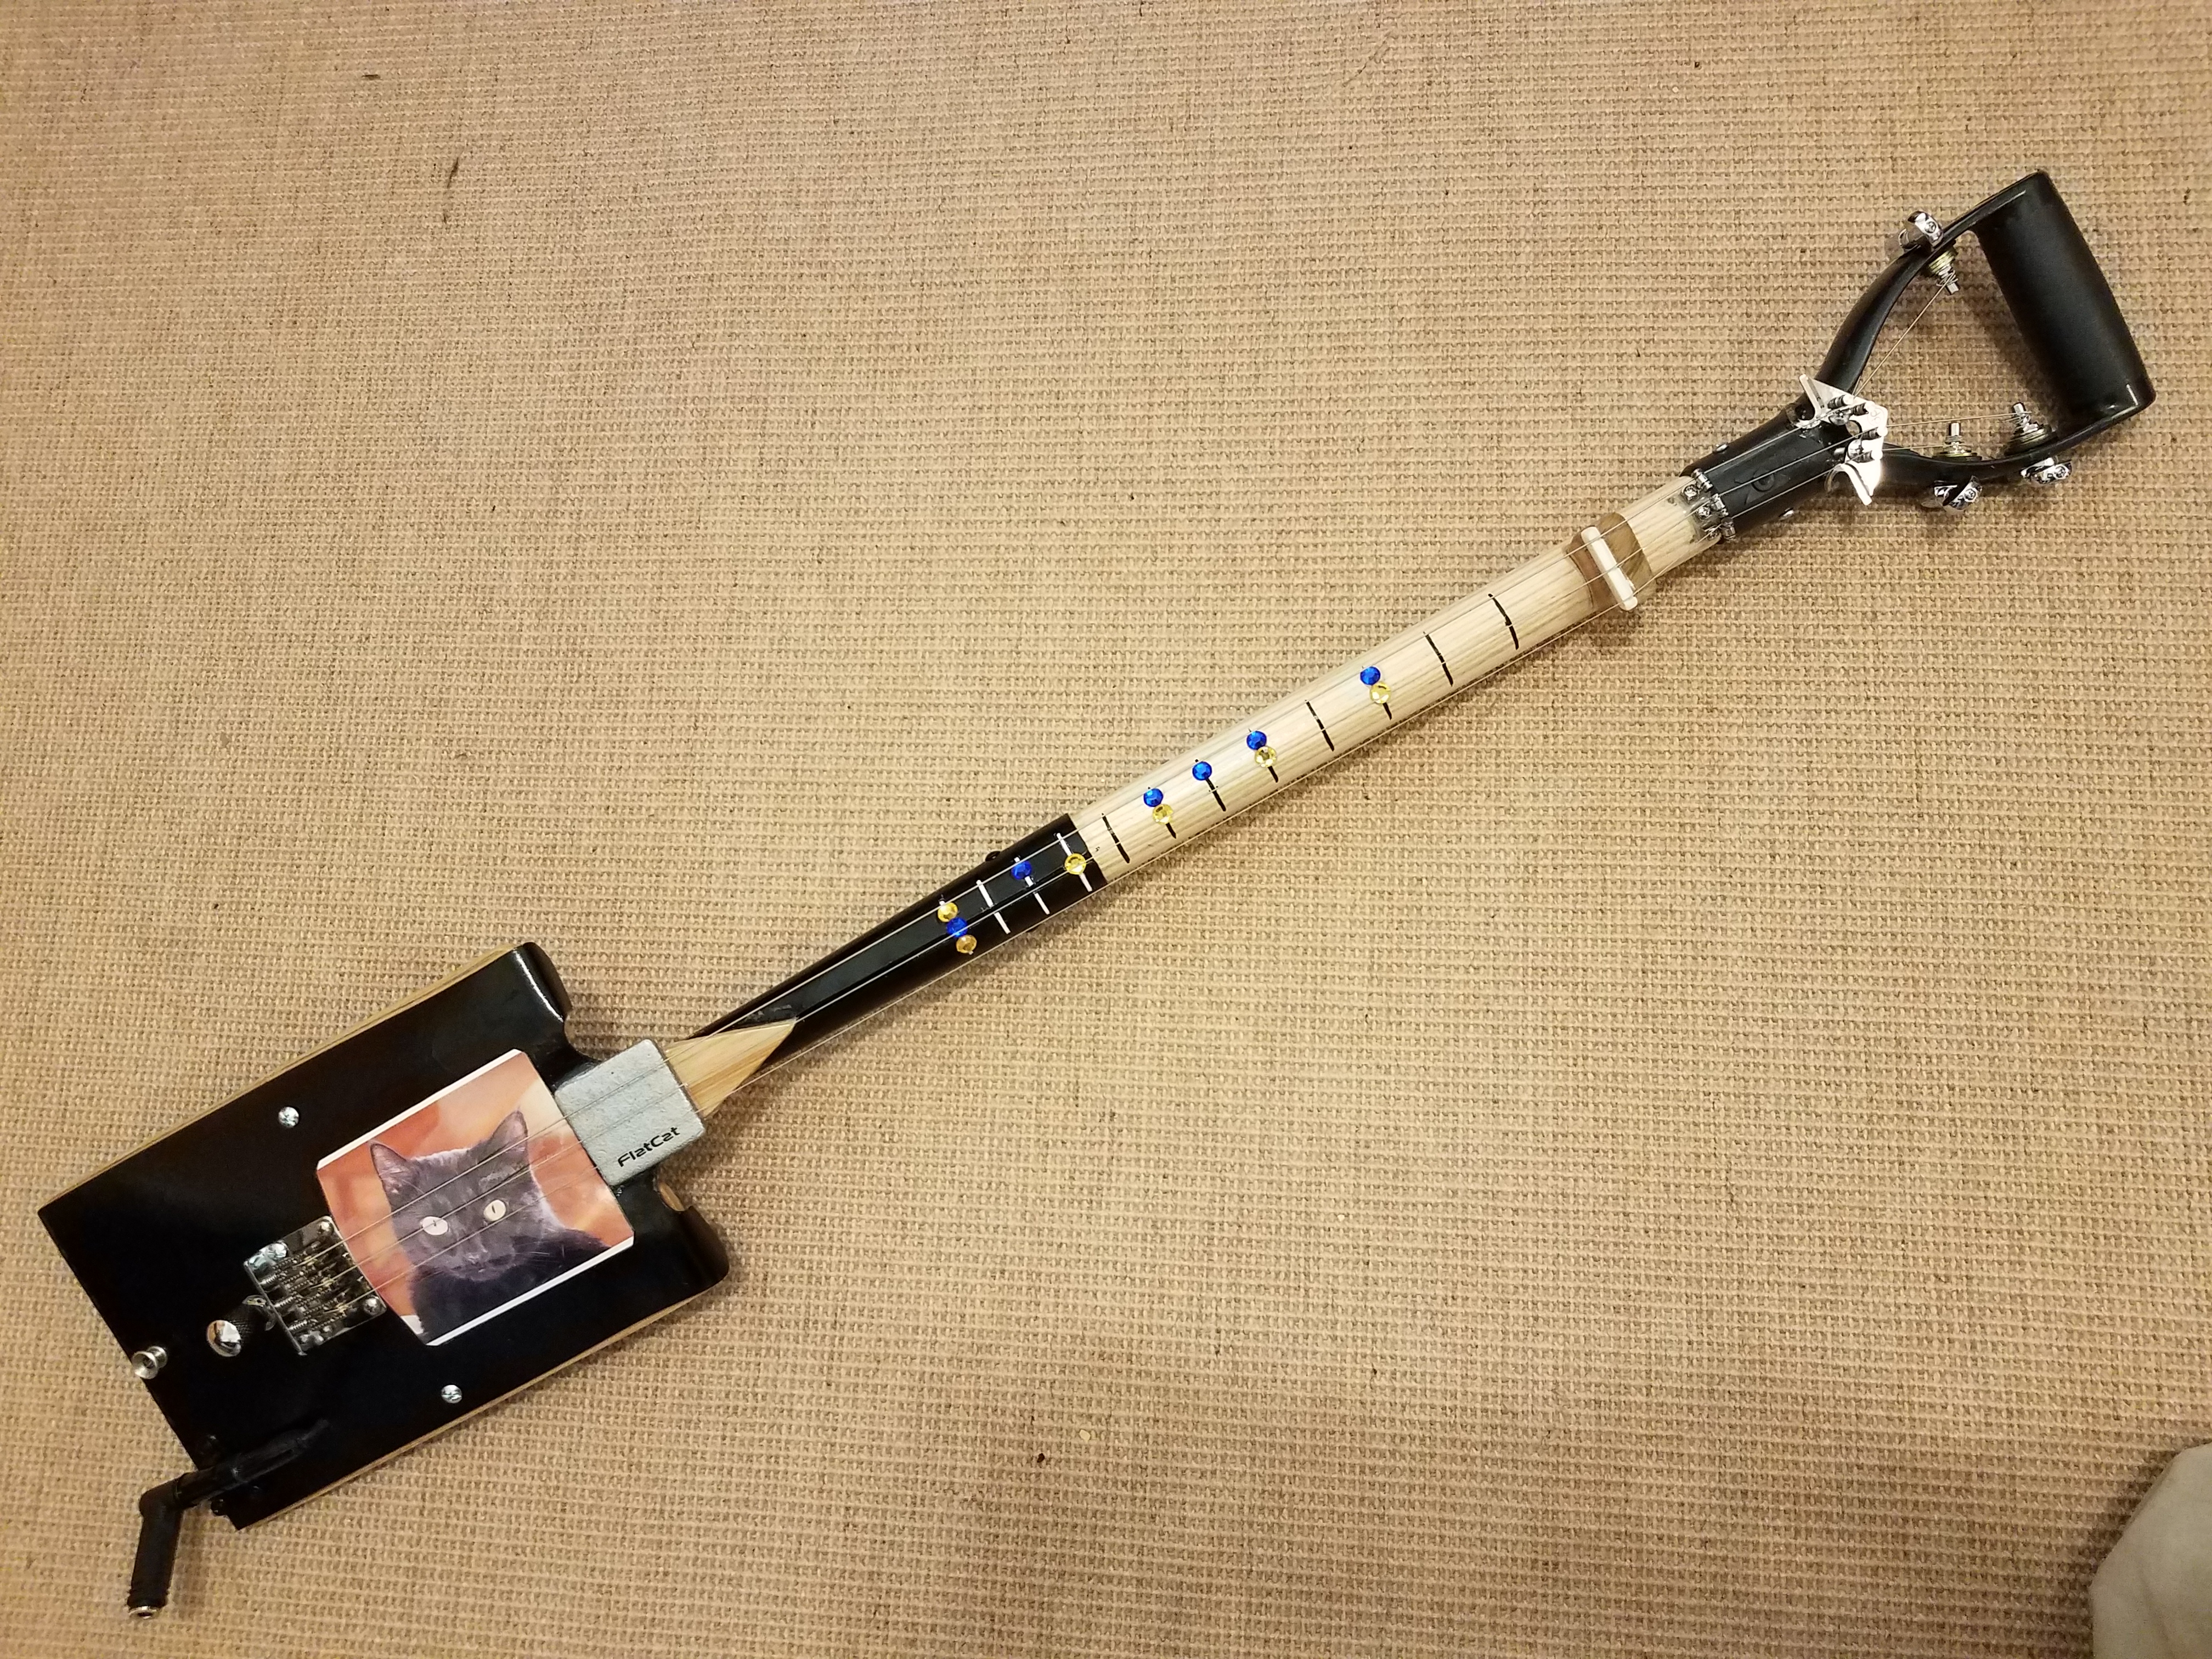
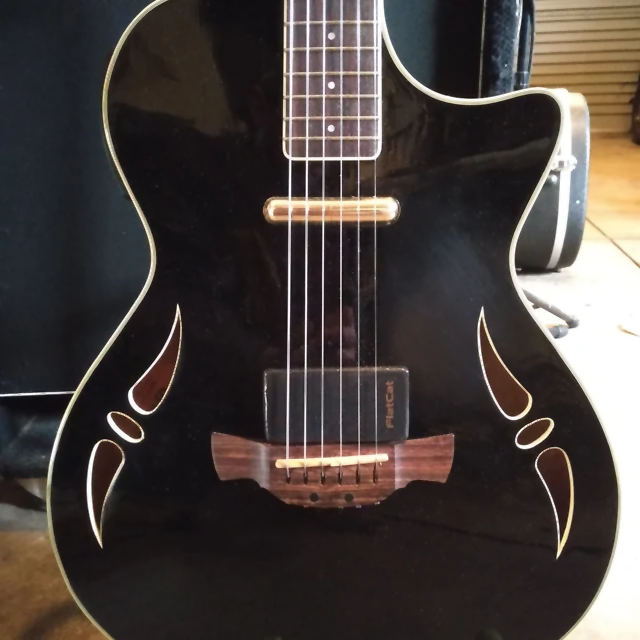
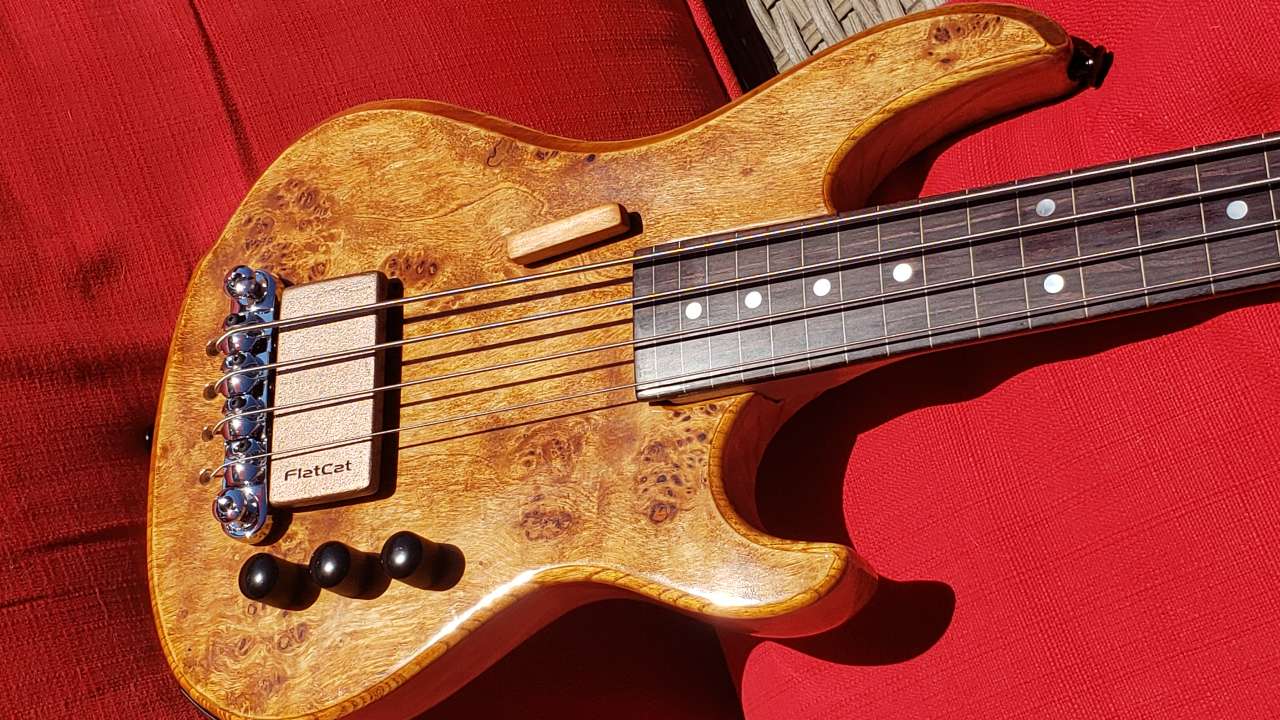
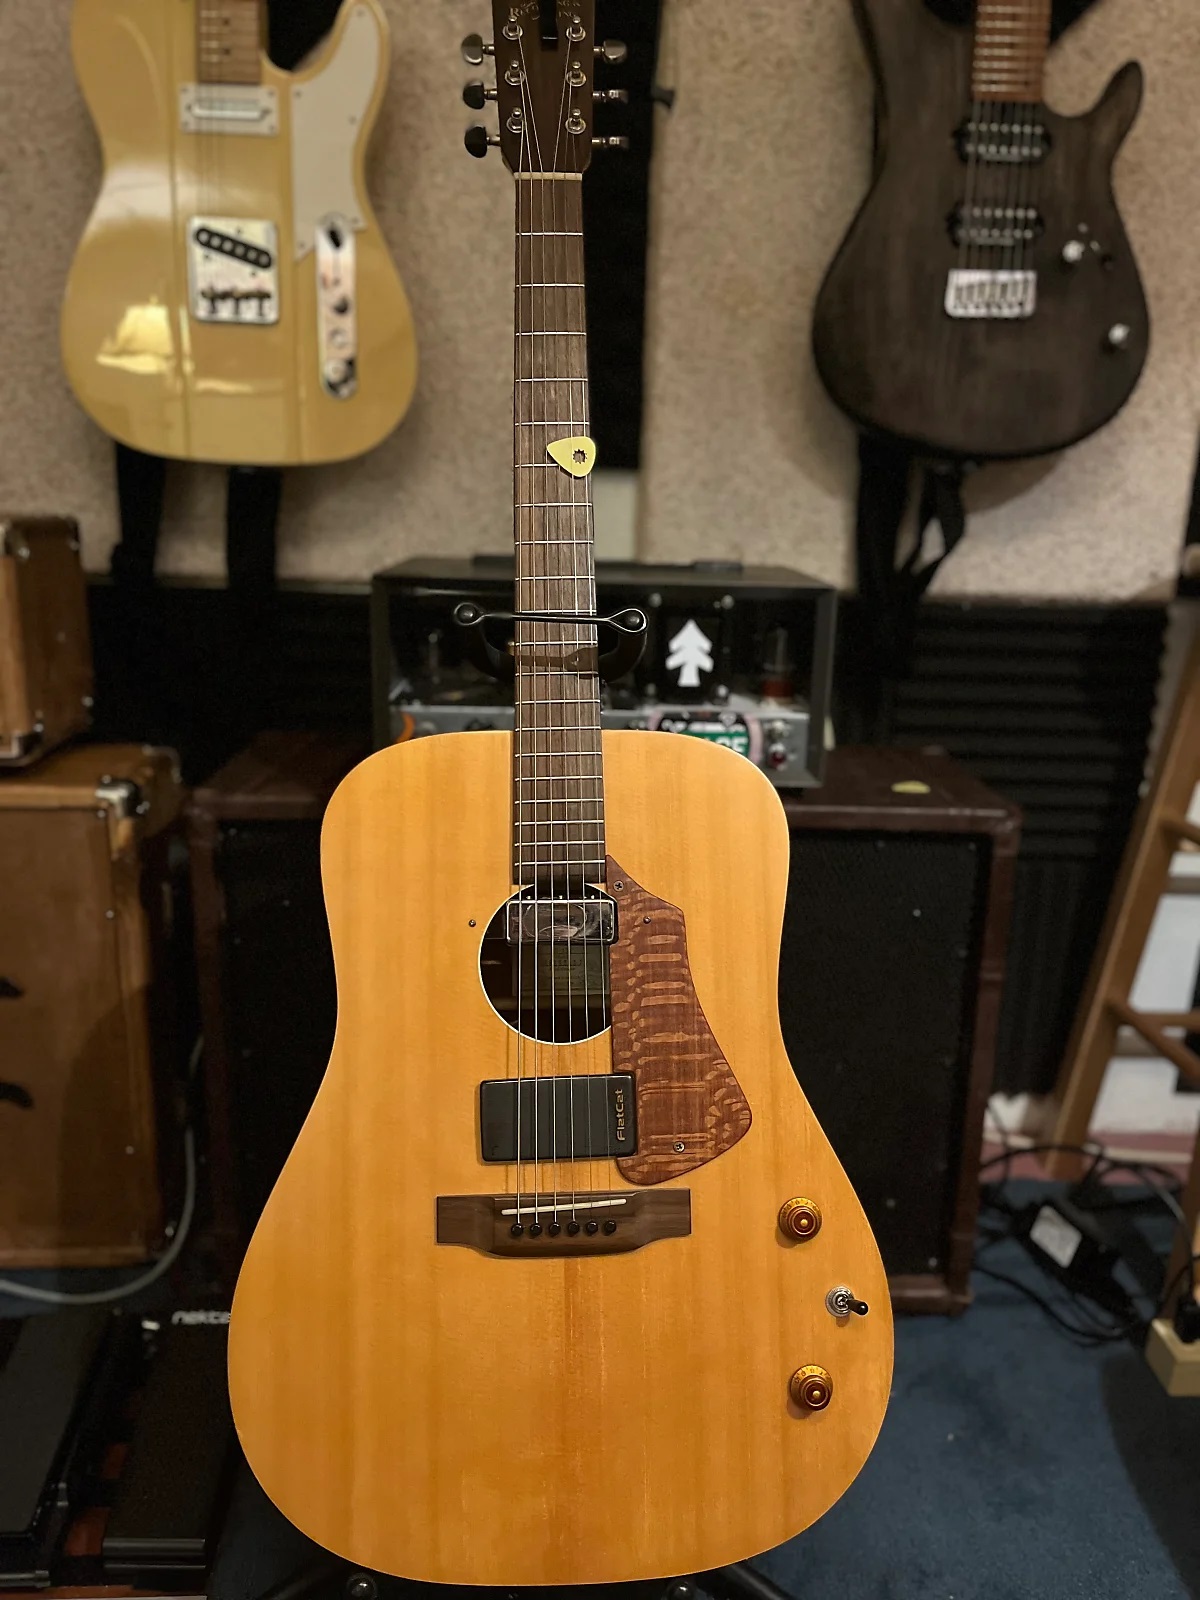

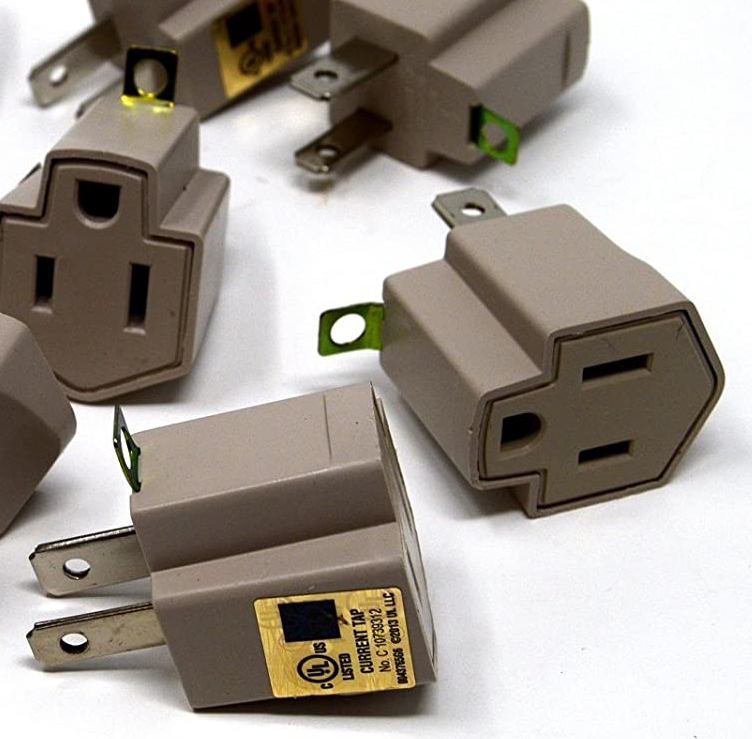


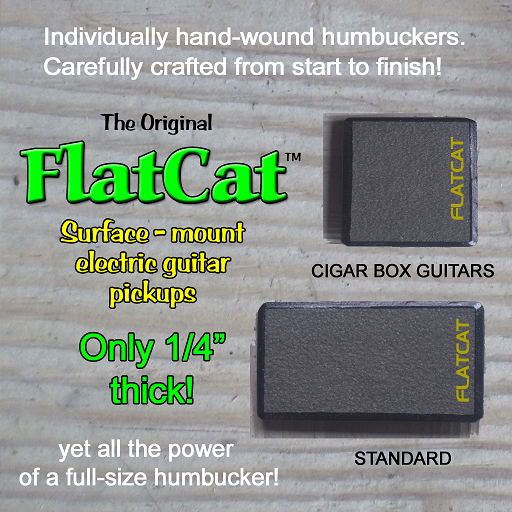
.jpg)
.jpg)
.jpg)
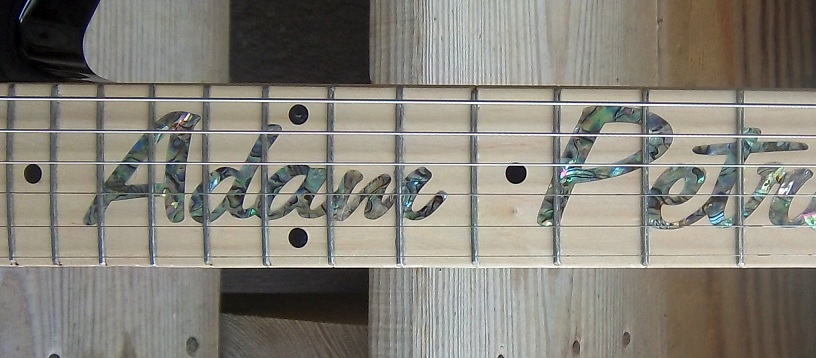
.jpg)
.jpg)
.jpg)
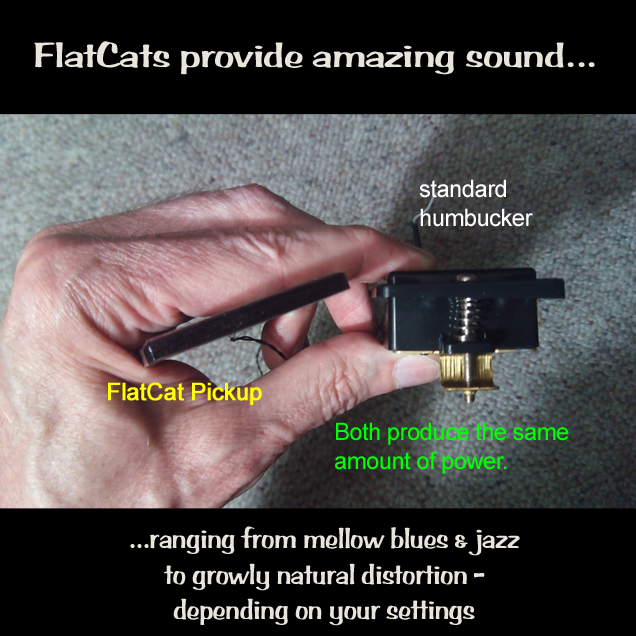
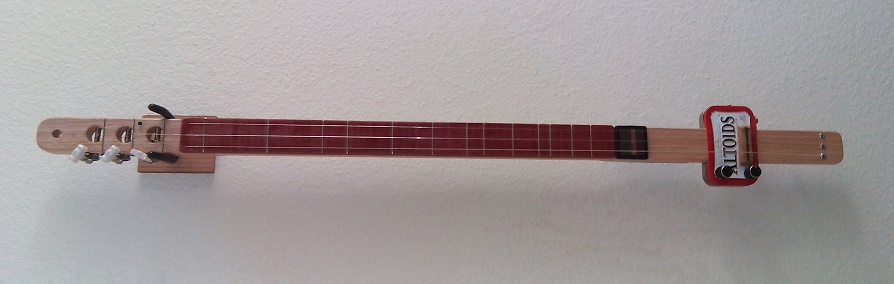
_smaller.jpg)
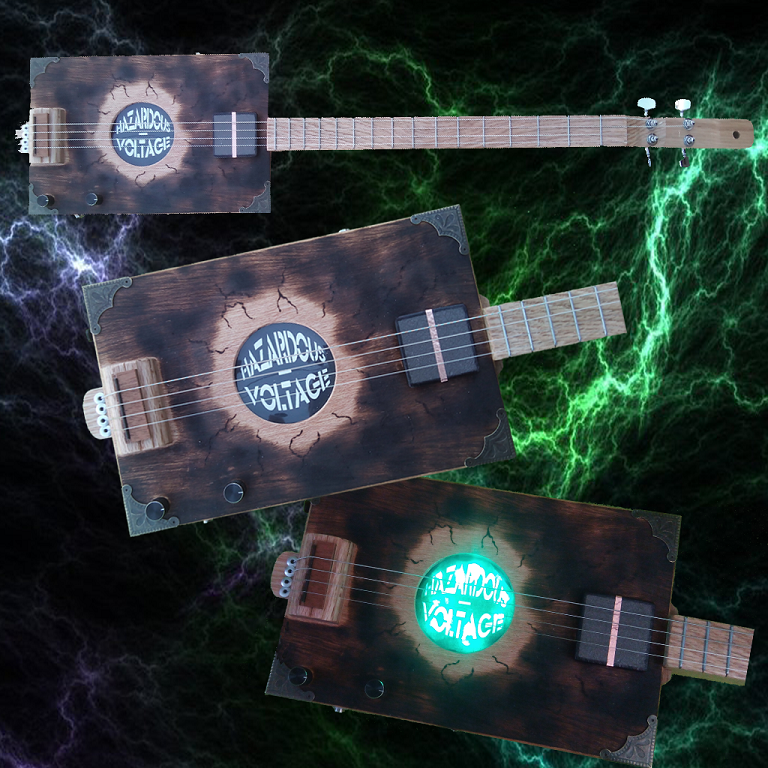
_smaller.jpg)
_smaller.jpg)
_smaller.jpg)
_smaller.jpg)
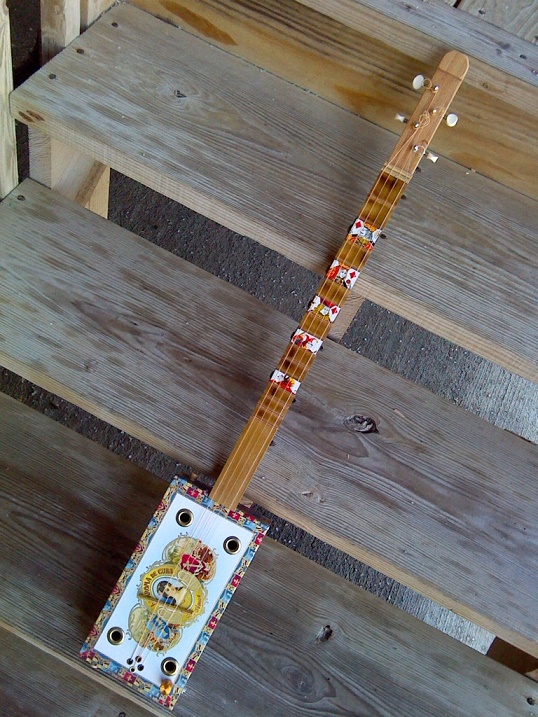
.jpg)

.jpg)
_smaller.jpg)
_smaller.jpg)
_smaller.jpg)
.jpg)
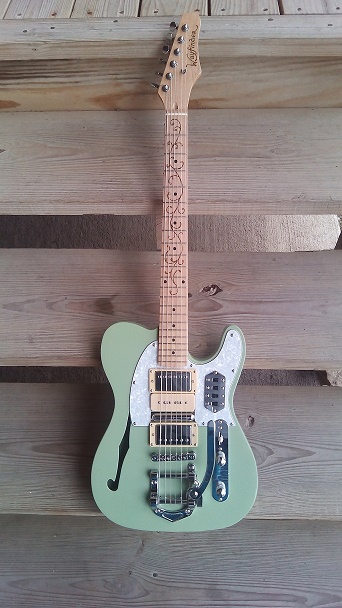
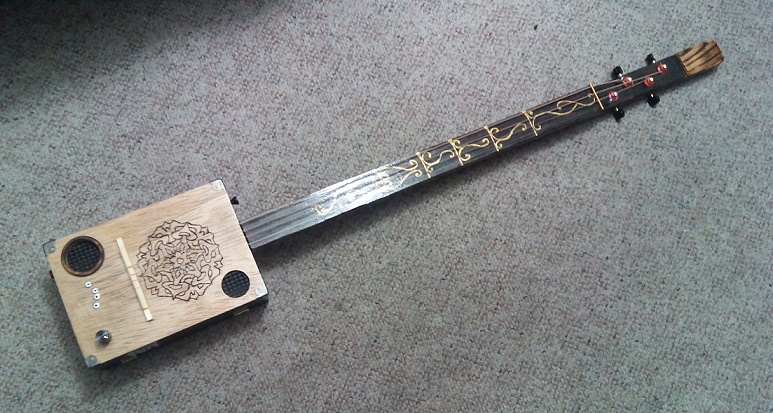
_smaller.jpg)
_smaller.jpg)
_smaller.jpg)
.jpg)
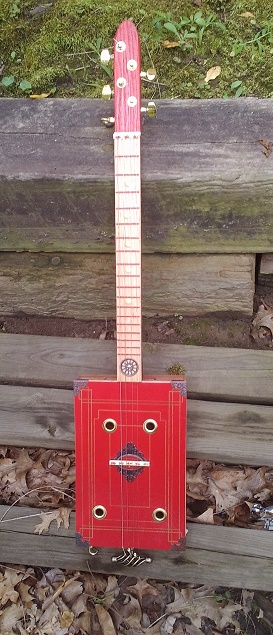
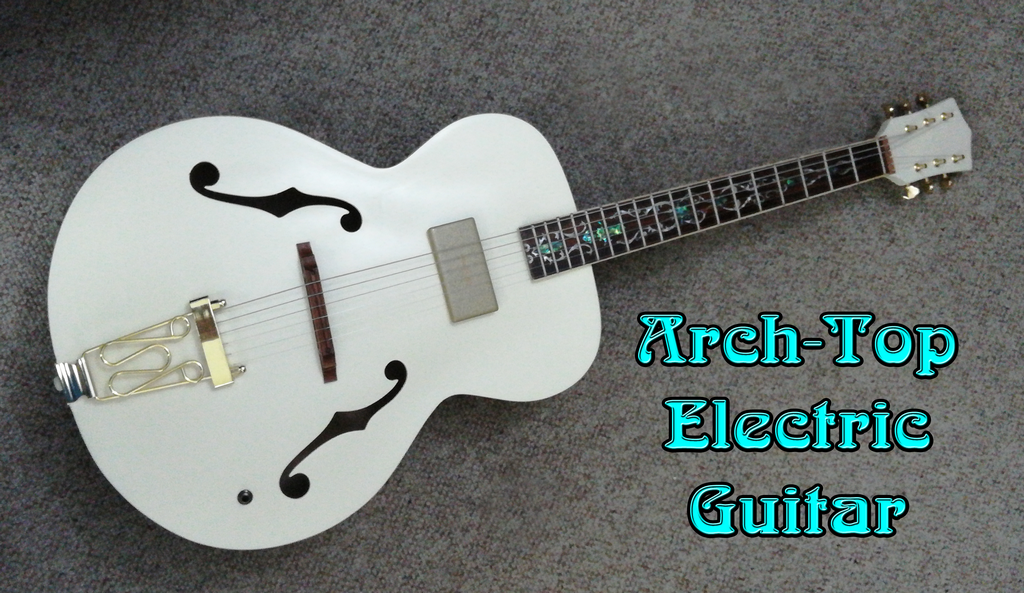
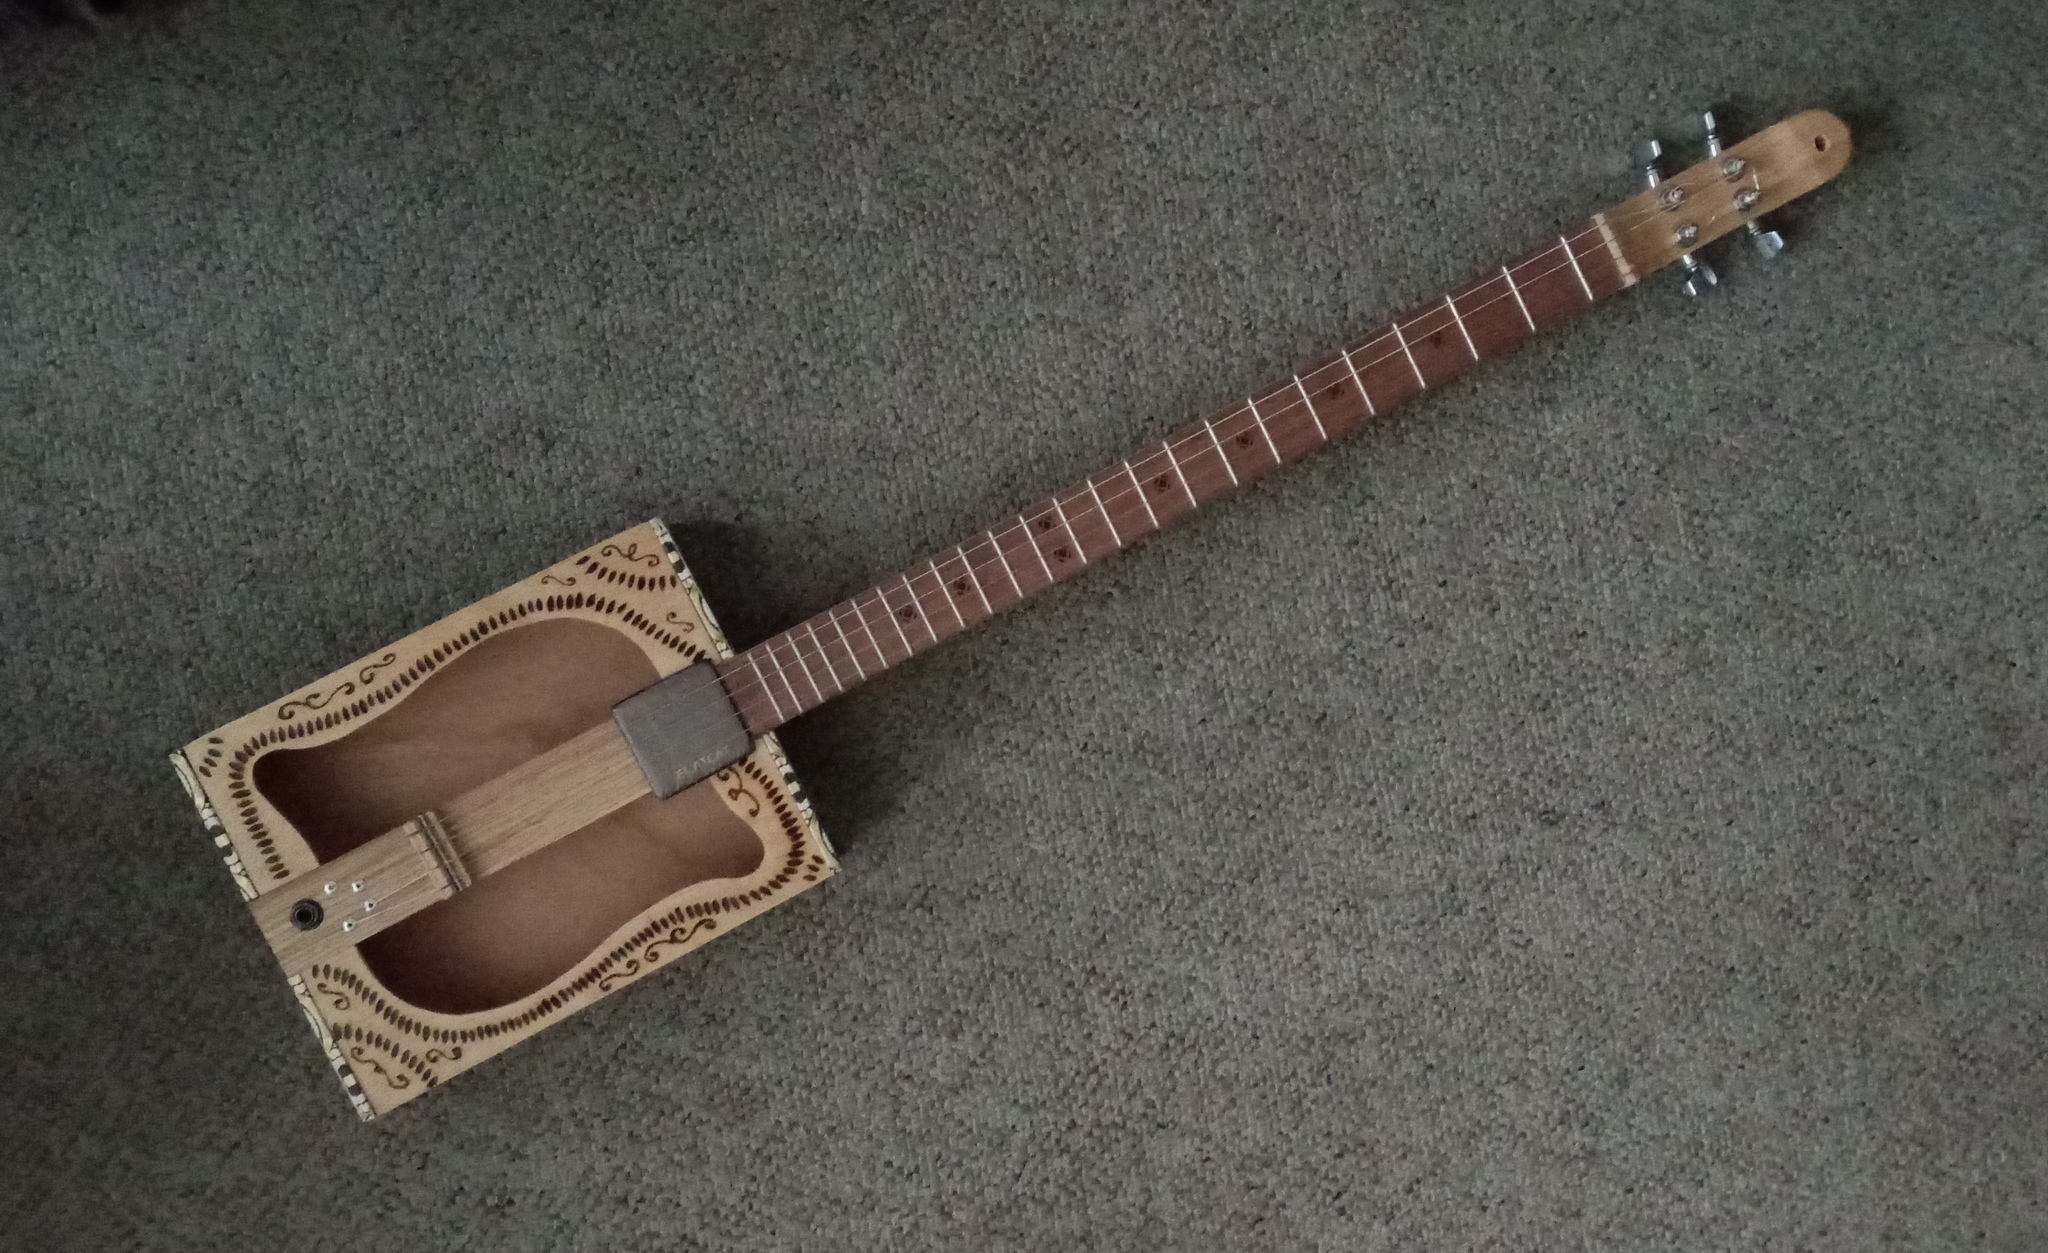
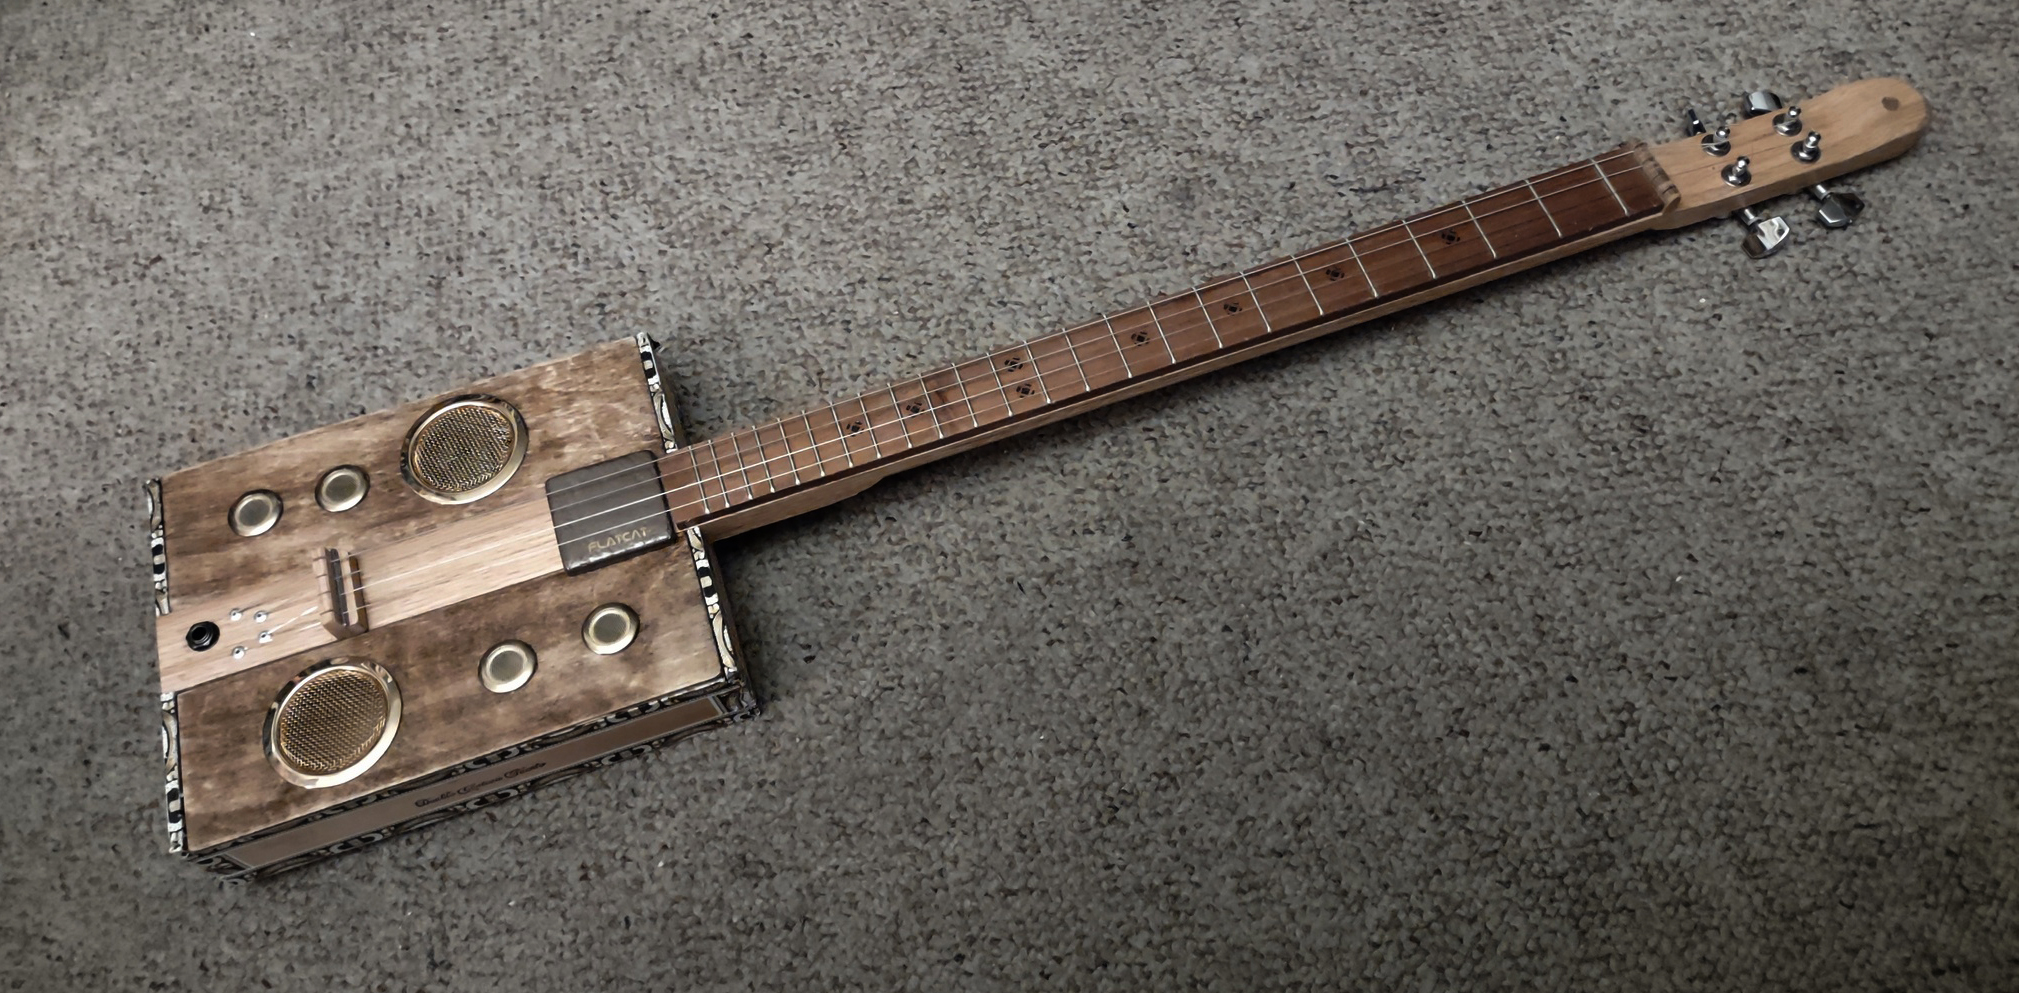
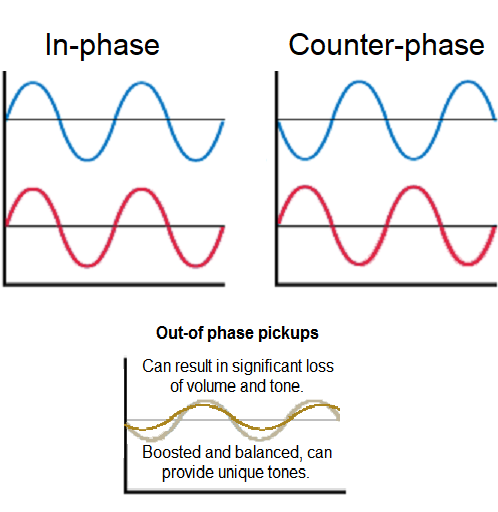
.jpg)
.jpg)
.jpg)
.jpg)
.jpg)